Character Overview/Basics

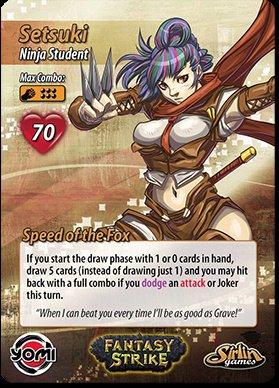
Okay so not sure if these are worth porting over but It took me a long time to make all 20 character basic guides so I’m bringing them with me. Will port the other ones over later. This is just a test one and I hope it works.

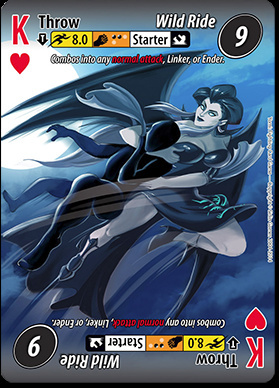
Let’s start with Grave Stormborne

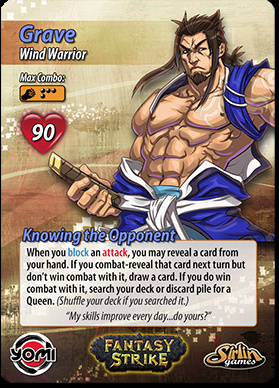
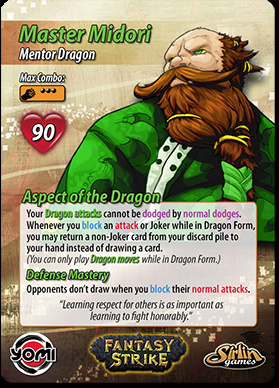
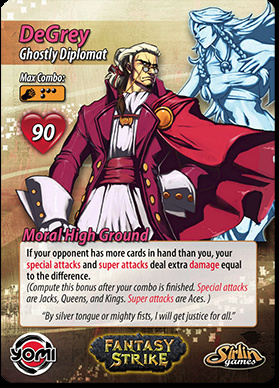
[details=Summary]Grave is Yomi’s all around fighter. He isn’t exceptionally strong, his combos tend to do around 20 damage at best (outside of his super attack) he isn’t exceptionally fast either, both his normal attacks and his throws are average speed. He is a character that is right there in the middle, He’s not falling behind in any one category but he isn’t far ahead any category either. Having said all that he does have a couple of exceptional options.

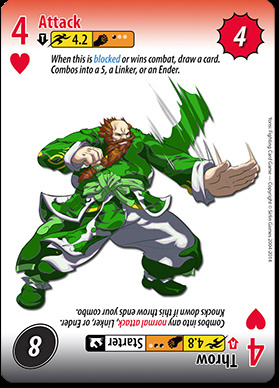
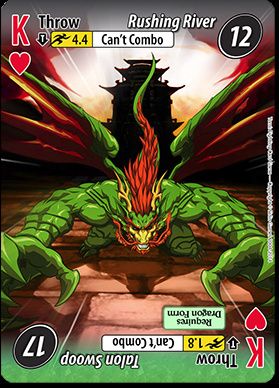
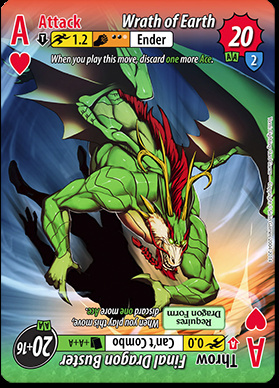
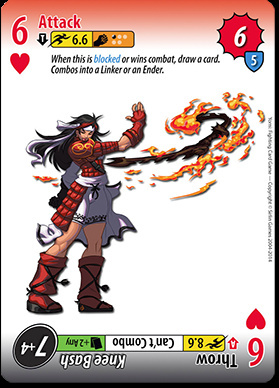
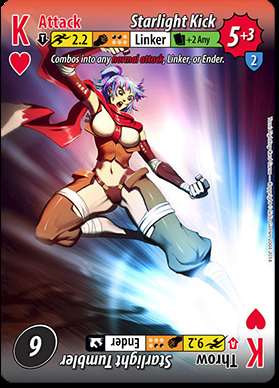
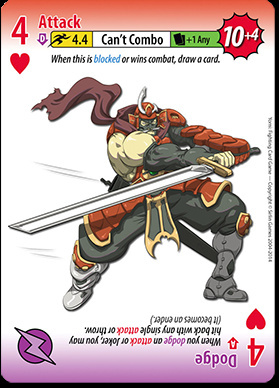
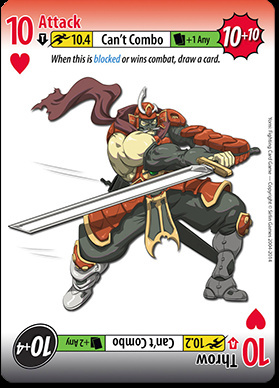
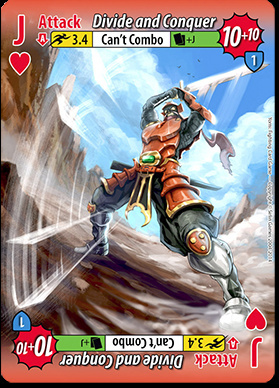
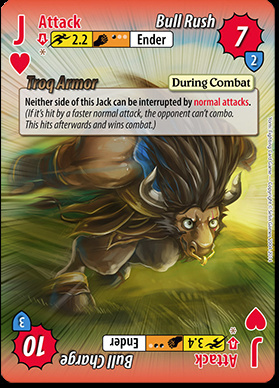
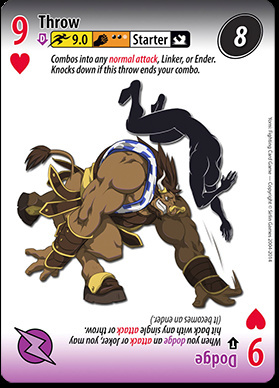
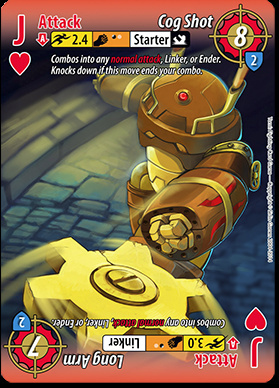
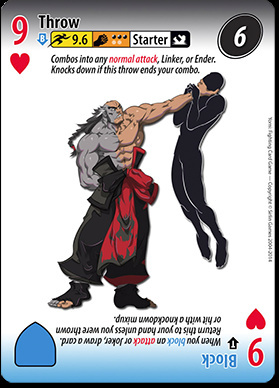
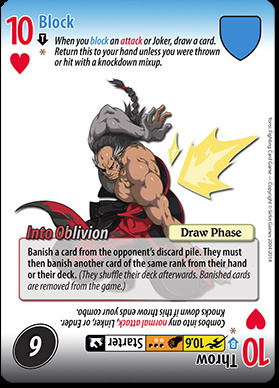
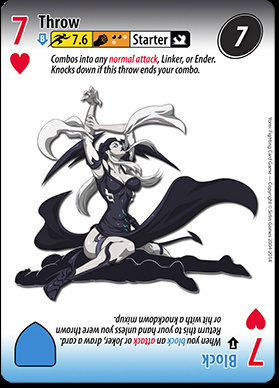
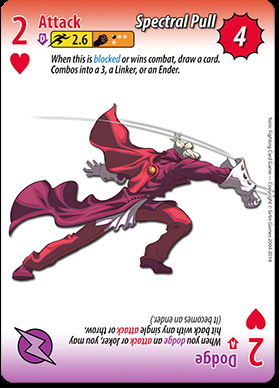
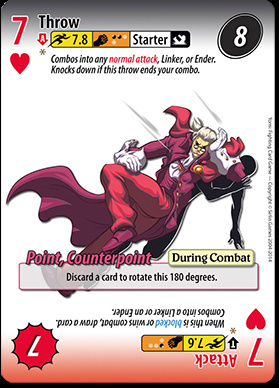
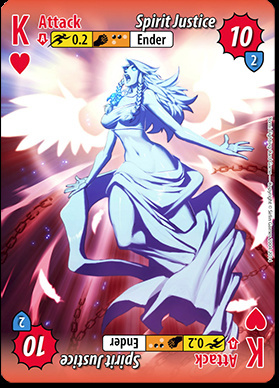
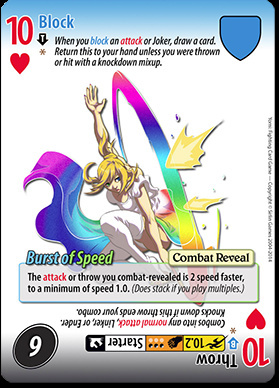
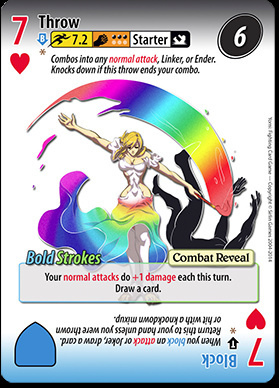
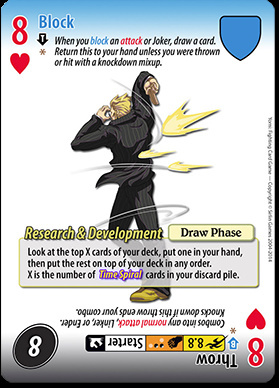
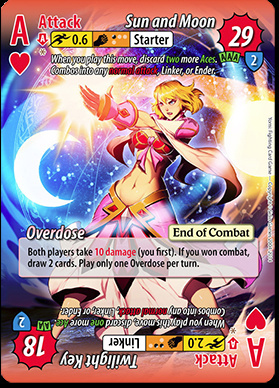
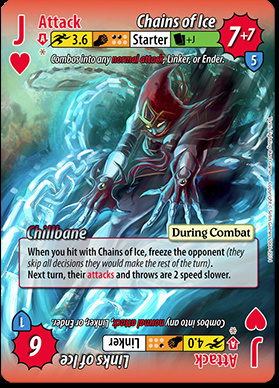
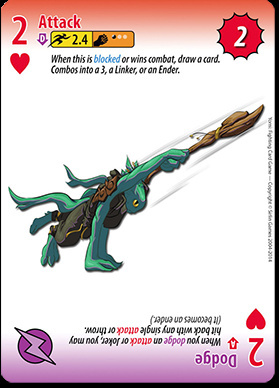
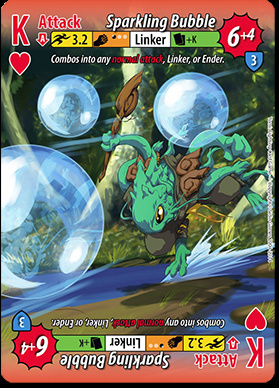
Notice how both Grave’s normal attack and throw here end there speeds at .6 (the cards speed is in the Yellow box at the top left of each of these cards) this is very middle of the road stuff.

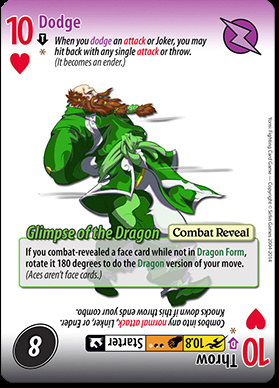
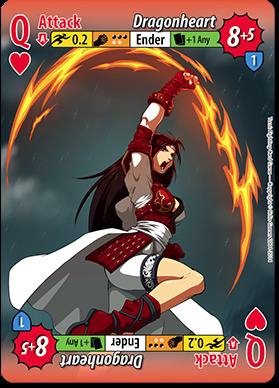
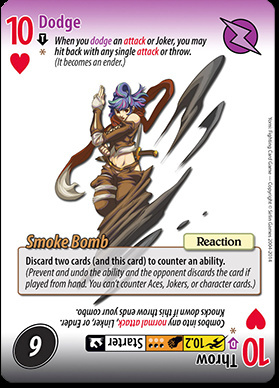
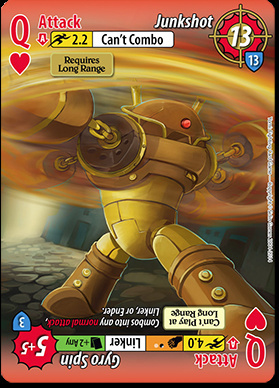
Having said all that he does have a couple of exceptional options. For starters his Dragonheart reversal is the stuff of legends.

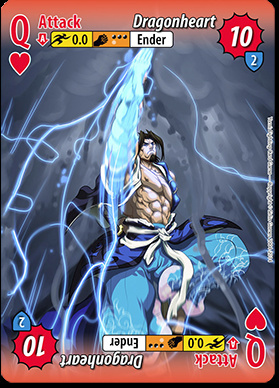
It’s speed is 0.0, that’s as fast as moves can get, and it does 10 damage for a single card which is solid damage efficiency. This is a really good defensive card because it will beat most other attacks in the game keeping Grave safe from a lot of scary combo starting stuff. It is also an extremely safe play for Grave to make when the opponent is KD. The only downside of the card is it’s only ever going to hit for 10 damage. It won’t allow you to combo into other moves. It is a low risk low reward play.

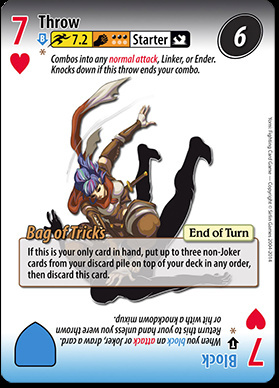
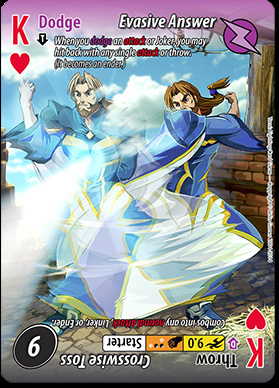
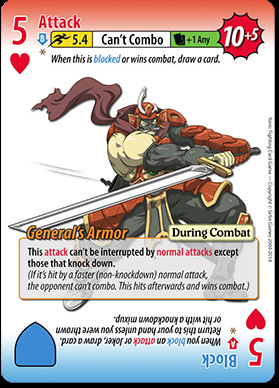
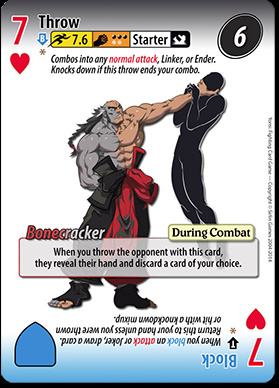
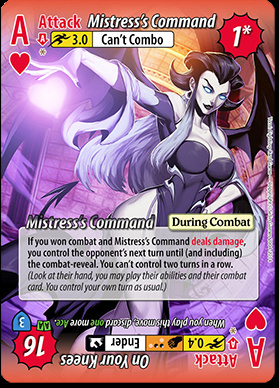
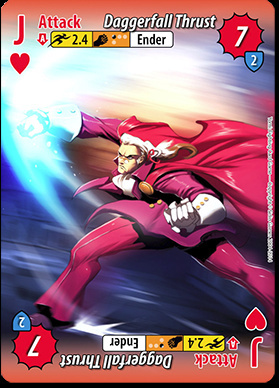
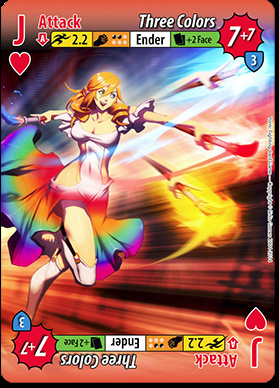
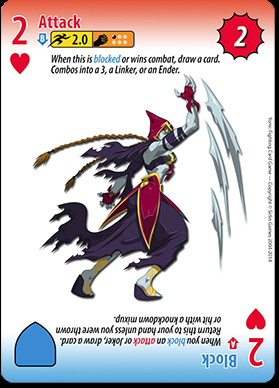
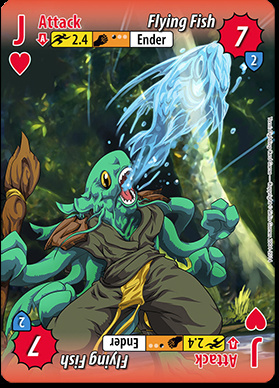
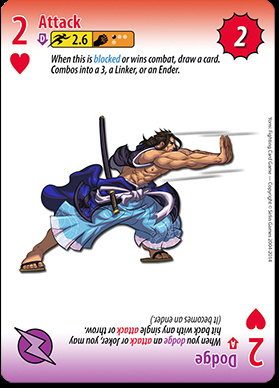
Grave’s Dragonheart is also tied to his innate. If you look at his character card above you will see that Grave has the ability to potentially get more Qs then most characters would. Allowing Grave to have a bit more consistent access to his Dragonheart. His innate also allows for interesting mind games on top of the typical mind games. For example lets say Grave revealed this card:

The only way for the opponent to not lose to either side of this card is by playing a block or dodge but the Grave player knows this and he can use this to his advantage and throw the opponent instead. This leads to all sorts of fun that Knowing the Opponent brings.

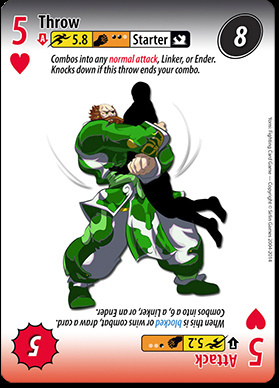
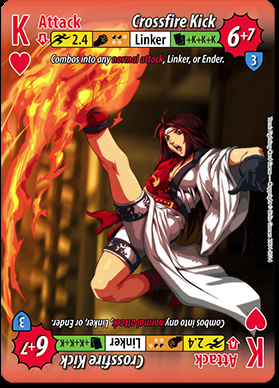
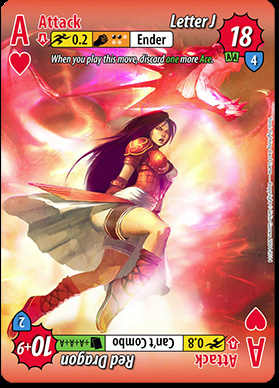
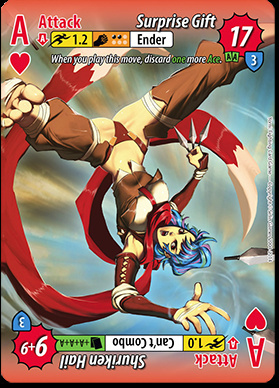
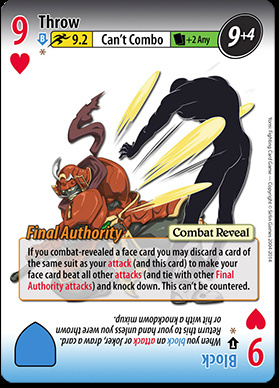
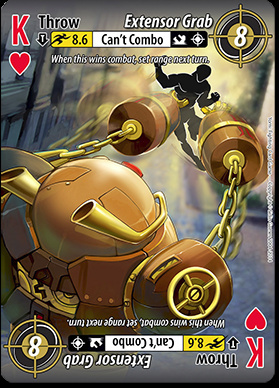
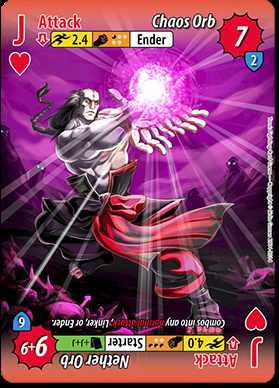
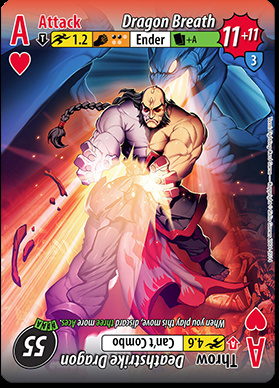
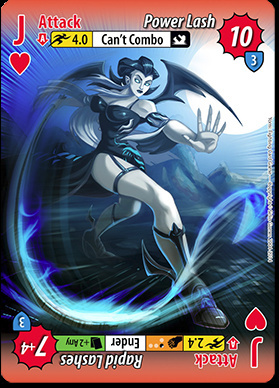
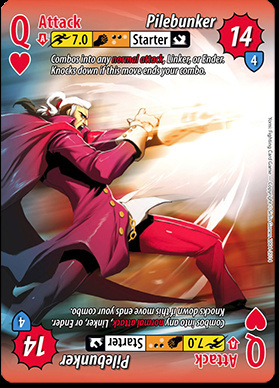
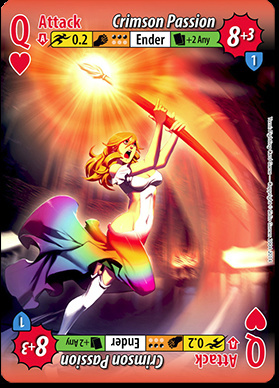
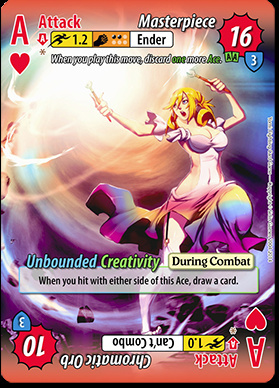
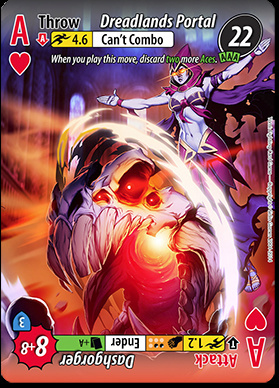
Grave’s ace is what a lot of his play revolves around

It is a very strong and versatile card. If you look at the top at True-Sparc Arc it is at the very good speed of 1.0 and it does 12 damage, that’s really good stuff! It is also only 2 out of his 4 combo points(cp) which means Grave can throw and then follow up with True-Spark Arc dealing 19 damage for only 2 cards, a lot of characters wish they had that kind of efficiency.

But the bottom of this pictured ace is where a lot of Grave’s scare comes from. The Dreaded True Power of Storms (TPoS). This is a move that takes three aces to be able to play it (it isn’t too difficult for Grave to get three aces) but it deals 45 damage only takes 3cp and it’s a speed 0.4 move!!! This move has a ton of hit confirm. Grave can try and normal attack then combo into TPoS, he ca try and dodge into it or he can just play it. The only way for the opponent to be safe from this mix up is to block/dodge which can open up Graves options and allow him to get more throw wins in.

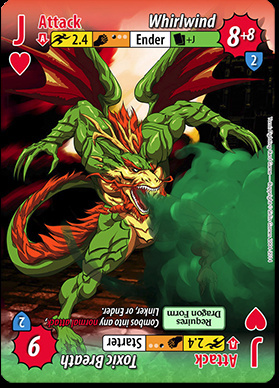
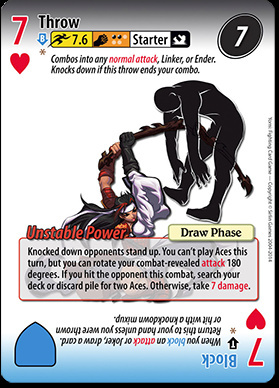
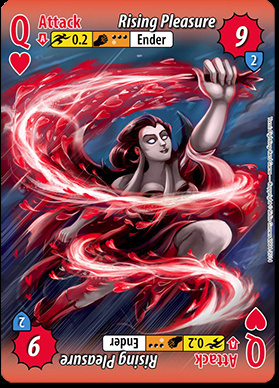
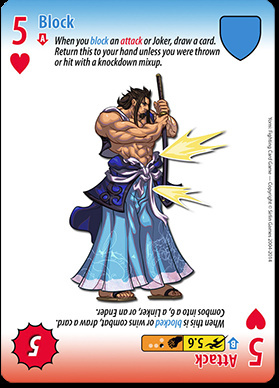
Grave’s Whirlwind attack isn’t as exciting as the previous two cards but still good in certain situations.

It is not bad at all when Grave has two in hand and he can get 14 damage for 2cp. Speed 2.2 is also quite handy in some mu.

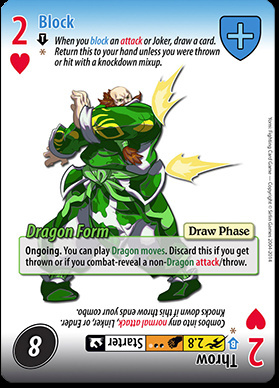
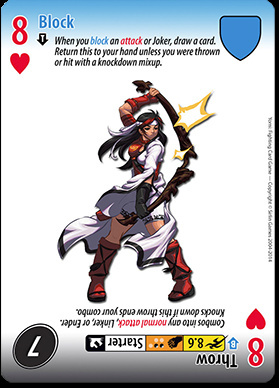
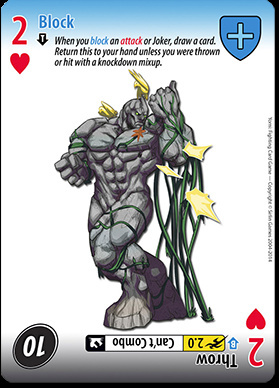
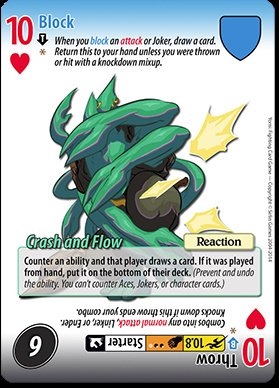
Often Whirlwind will be used to fuel Grave’s Mental Toughness

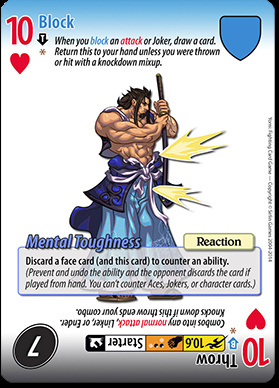
To use Mental Toughness Grave must discard it plus a face card. When he does he gets to counter an opponent’s played ability (the ability can’t be one that comes from their innate or aces). This allows Grave to be safe from a lot of powerful abilities and having one in hand can be comforting (as long has he has the face card to pay its cost). No one gets the best of The Wind Warrior.

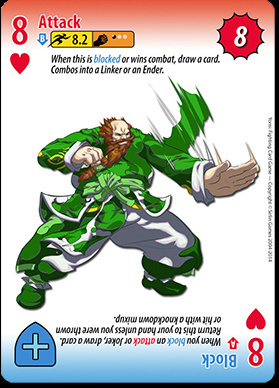
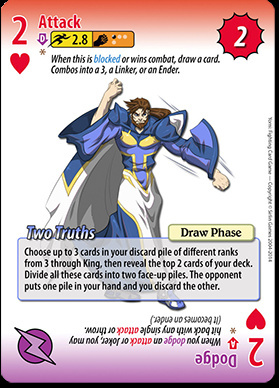
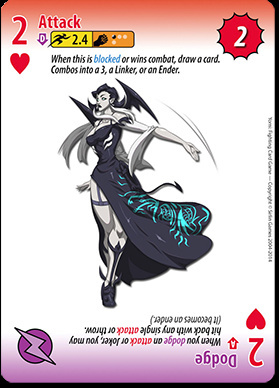
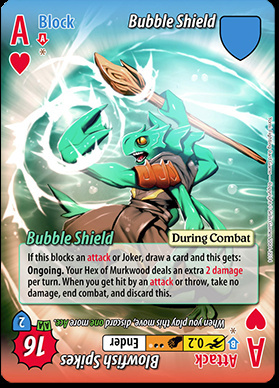
Grave’s Lightning Cloud attack is a very fun card

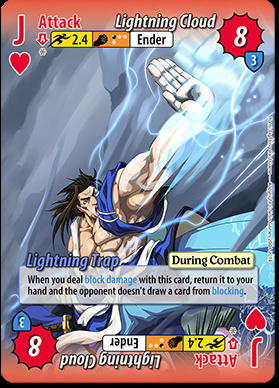
It is pretty much the standard J type card except it does 3 chip and it has the extremely cool Lightning Trap ability. As long as this card does chip damage (so it’s blocked by a normal block) the opponent doesn’t get to draw a card and Grave gets to return this card to his hand. So both Grave’s hand and the opponents hand will be growing at the same speed and Grave will be getting in 3 chip damage while also being safe from throws. It is a very flavorful card, it very much has the feel of a Ryu fireball spam.

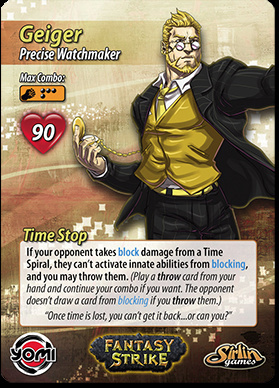
Lightning Cloud is very match up specific. Against some characters (like the grapplers or Geiger) It is an amazing combat card. Against others it’s only real use is to stick on the end of combos or to fuel the Mental Toughness ability.

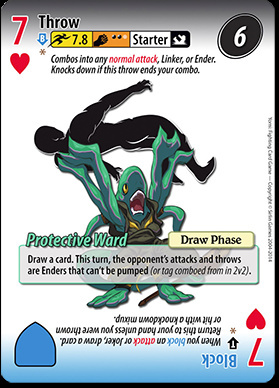
That all sounds really good but Grave is not with out his Weaknesses, although since he is the all around fighter he still doesn’t fall too far behind in one category. His biggest weakness is his throws. They are average speed and he has an average number of them but when you take into account he has two really good abilities on his throws it stretches them out.

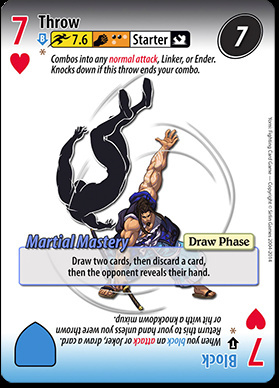
This is Grave’s final ability which allows him to draw two cards then discard a card then look at the opponents hand!!! This can be such an amazing ability. It gets especially good when the opponent is on low hand. No one has greater Mastery of the Martial arts then Grave.

Grave will have to be careful how often he uses his abilities because he can very well run himself out of throws if he uses them too often and then the opponent can much more safely block and dodge.

If you want a character that has answers to the opponents options and don’t mind having average normal attacks and having to more carefully manage your throws and abilities then you will want to check out Grave Stormborne the Wind Warrior.[/details]

13 Likes

I would remove the spoiler tags, I think.

1 Like

hmm, that’s strange. I copy and pasted with the spoiler tags but when I made the post they disappeared. I just figured they got swallowed because they don’t work on the page. Thanks for letting me know they’re still there.

1 Like

I’d just like to be pedantic and point out that Final Authority can make Onimaru’s face cards have a speed value of -∞. That’s actually how it’s written on his stats card.

5 Likes

[details=Summary]Master Midori is an honorable fighter that can turn into a dragon and then spit a cloud of toxins on the opponents face. Midori is a defensive character that has efficient and fast throws (he’s a Grappler). He likes to play a block/throw game to build up a hand of powerful dragon cards and then go into dragon form and tear stuff apart.

If you look at his innate Midori’s dragon attacks can not be normal dodged. This means that Midori doesn’t have to be any where close to as afraid of scary thing/dodge mix up because his dragon attack just eats the dodge, nom, nom.

When Midori is in dragon form he can also get non-joker cards back from the discard on a successful block giving Midori the potential to keep scarying his opponent while he’s in dragon form.

Defensive Mastery rounds out Midori’s innate and it stops the opponent from drawing cards when their normal gets block. When opponents face Midori they have to respect his throw/block game.

Midori is a Grappler so he has fast throws

These are two of Midori’s standard throws that he uses with the slower of the two being speed 5.8. If you look at Grave above his fastest throw is speed 7.6 which means Midori’s slowest throw that he uses is faster then most characters fastest throw. This means that Midori’s throws will beat the opponents throws plus their blocks and dodges, wowow that’s 3/4 of the opponents options.

However, because of this Midori will have to block a lot if he scares the opponent enough with his throws. This plays into his game of wanting to build up a powerful dragon hand.

Midori can only go into Dragon Form by discarding a 2 card

When Midori goes into dragon form he can now play the more powerful sides of his face cards and ace. He will stay in dragon form until he is thrown or he plays a non dragon move.

Midori’s J is his weakest Dragon Move but still strong if it connects.

The bottom of this card is the Dragon side (you can tell because it is green along the bottom of the card, nice touch! and it also has a tag that says Requires Dragon Form). It is a really strong move if it connects and leads into Midori’s highest damage attack combos. It is average on speed so it can be difficult to connect with.

The other side of this card is Whirlwind and it is only 1cp which means Midori can stick it on the end of his throws and if he has two Whirlwinds in hand it will lead to a 24 damage throw!!! that is a ton for a character that has the Grappler speed throws. It is also a decent attack poke for a Human form Midori.

Every one fears the Dragon Mountain (what sane person wouldn’t fear a mountain of dragons?)

The top of the card, Rising Mountain, is a decent card but it pales in comparison to the beastliness that is Dragon Mountain. Dragon Mountain hits for 14 damage at speed 0.6, that is quality stuff. It gets even better because Midori has normal attacks on his high normal cards meaning you can squeeze some strong damage out of that last remaining combo point.

Dragon Mountain is a precious resource for Midori and shouldn’t just be tossed away haphazardly but instead save for the right moment to take best effect. It is Midori’s only attack that is faster the speed 1.2 so should be saved to threaten something scary and to get him out of deadly mix ups.

With this normal attack plus DRAGON MOUNTAIN Midori can put out 22 damage for two cards at the fast speed of 0.6

Dragon Mountain can be even more fun for Midori if he enters it stealthily. Midori has an ability called Glimpse of the Dragon.

If Midori plays the human side of a special move (face card only) he can discard this card to flip it to the dragon side. It is a joy to be a stealth dragon. It is harder for the opponent to detect stealth Dragon Mountains then when Midori officially goes into dragon form.

Midori’s final dragon special move is Talon Swoop

The human side is pretty good and can be helpful at times but again the dragon side cranks it up several notches. 17 damage for a single card is as good as it gets. This single card is close to or equal with characters double ace attacks in terms of damage. That’s just how powerful Dragon Midori gets.

If Midori enters dragon form with a couple of Talon Swoops and a couple of dodges Midori can play the scary mix up of Talon Swoop/dodge and if Midori gets it right the opponent is going to be down a lot of life very fast.

Midori’s final card of interest is his ace

The top of the card, the human side, is the standard double ace attack. It does 20 damage at speed 1.2 which is very good in a lot of match ups and will be a great scare tool for Midori. When Midori is in human form and he has two or more aces the opponent has to respect his options a lot more. Wrath of Earth is also human Midori’s most damaging dodge follow up.

The dragon side again takes things to uber power levels. It also does 20 damage for two aces but up to two additional aces can be discarded (this is called pumping) for each ace discard Final Dragon Buster does 16 more damage. This means the move caps out at 52 damage. This is the second most damaging move in the game. It is also a speed 0.0 throw. Midori can play a Final Dragon Buster/dodge mix up and if he gets it right he’s hitting for a ton of damage. Midori just needs to watch out for jokers when doing this mix up because they will ruin his day.

Final Dragon Buster can only be played if Midori is in Dragon Form. Not even Midori can stealth dragon into such a powerful throw.

To compensate for Midori’s powerful mix ups he also has several weaknesses. All his weaknesses come from the fact that he doesn’t have many fast attacks and he only has one attack that is faster then speed 1.0 (a very important speed to have in Yomi) and this card requires another card to work.

Midori is terrible when he is knocked down. He doesn’t have lots of fast attacks to defend himself so he is very vulnerable to mix up normals which messes with the throw/block range he wants to play.

He has very few dodges

Midori has 8 dodges in total and four of them have the strong Glimpse of the Dragon ability on it. Because of this Midori really has to make the most out of his dodges.

If you want to play a defensive character that throws the opponent around while trying to build up a powerful hand of strong dragon moves Master Midori the Mentor Dragon might be for you.

If you like the sound of Midori and want more in depth information you can check out this longer guide I wrote here:Mastering the Mentor[/details]

8 Likes

[details=Summary]Jaina Stormborne (yep Jaina and Grave are siblings) is a reckless fighter. She really wants to win combats with attacks. Jaina has a much higher pay off winning with attacks. Also thanks to her innate she has a very different way of approaching hand management then the rest of the cast. Jaina’s innate allows her to buy back cards she played at 3 life each, except Qs or aces, as long as she attacked that turn. This means that Jaina can build up her hand while attacking at the cost of spending her life, she is very reckless you only live once type of woman.

Jaina gets even more reckless when she is low on life. When she reaches 35 or less life she can start to buy back Qs and aces for 4 life each, which is big because those are her fastest attacks.

Jaina can build up her hand while keeping pressure on the opponent. Jaina’s attacks deal more chip damage (the damage an opponent takes when they block an attack) this allows Jaina to go life even or come out a little ahead on life when she buys back her attack and the opponent blocked her attack.

Something that is completely unique to Jaina is her red normal (her hearts and diamond suits) attacks deal chip (chip damage is the number in the blue shield). The amount of damage they deal is equal to the cards damage minus 1.

One of the highest chip damage cards in the game is on Jaina’s J

Flame Arrow (the top side) is a bit slower then the normal J but it does high chip when blocked. Charged Shot is even more impressive with 7 chip. It is also a starter this means that if it wins combat Jaina will be able to make some pretty high damage combos. She then has the option to buy back her cards and threaten with those cards again, such is the way of the Phoenix Archer.

Charged Shot is slow so it is one of Jaina’s gutsier plays but making those plays happen is where a lot of the fun of aggressive I want to punch/kick/shot you as hard as I can Jaina comes from.

Even if the card is blocked getting the chip and wearing the opponent down in the early game can set Jaina up to make strong plays in the late game through her other cards and abilities (more on those later).

Jaina’s Dragonheart reversal isn’t quite as fast as her brothers but her’s has a higher top damage when you factor in the +5 for pumping the attack. What’s nice about Jaina is that even though she can’t buy back Dragonheart until she is lower on life she can buy back the card she used to pump it.

When Jaina is in Burning Desperation mode (at 35 or less health) she can become pretty oppressive with her Dragonheart. Depending on the opponent she can play a strong mix up of Dragonheart/throw and keep the opponent guessing and scared. If she plays Dragonheart and it gets blocked/dodged(if things go really well dodge won’t be an option for the opponent, more on that latter) she can buy it back and try all over again.

Jaina’s Crossfire Kick would be pretty bad if almost any other character had it because it only shines when you have multiple in hand. However, since Jaina is her reckless self she can play these in combat when she has them, buy them back, and as the game goes on she is likely to get more in hand making this card stronger and stronger as a combat option.

Another point worth noting is Crossfire Kick does 3 chip damage so even if it gets blocked and Jaina buys it back for 3 life she has still gone even on damage with the opponent.

Crossfire Kick is Jaina’s fastest card for starting combo’s. 2.4 is an okay speed but still faster then her other combo starters and if it connects and Jaina has several in hand she will be able to get in a ton of damage. This card can do 27 damage for 2cp!!! while that is extremely rare Jaina can still get a lot of damage out of Crossfire Kick.

Just like her brother a lot of Jaina’s scare comes from her aces. Her ace is extremely versatile and she can use it in every way imaginable. Thanks to the Red Dragon side she can use single aces in hand to poke the opponent at the strong speed of 0.8 for a respectable 10 damage. If Jaina has all four aces she can deal 37 damage, she can do this off a dodge or by winning with the Red Dragon side.

The infamous Letter J at it’s scary speed 0.2 dealing 18 damage for two aces. It is also only 2cp meaning Jaina can combo into this card off of any win. She can throw into high normal into Letter J for 31 damage. If she happens to win with an attack that can combo into this then the opponent is going to be in all kinds of pain.

Keeping with Jaina’s theme of high chip Letter J does 4 chip damage which is strong for such a fast move and allows her to choke out her opponents in the late game. Jaina doesn’t play nice.

Since Aces are such a key part of Jaina’s game plan she has an ability that both helps her win combat and get aces.

When this card is played it allows Jaina to flip any combat revealed attack next turn. If she hits she gets to search her deck and/or discard for two aces!! that’s a lot of firepower is she wins on unstable power turns. If she fails to hit that turn she takes 7 damage, Jaina doesn’t care about her well being she just wants to burn the opponent.

Jaina has strong cards she can use on unstable power turns.

These are both strong cards to use. The card on the left will beat all attacks and throws. The card on the right will beat all throws, blocks, and dodges. With these two cards in hand Jaina has a very strong mix up and if she gets it right she will be getting two aces. When that happens Jaina is a very happy lady.

Just because Unstable Power gives Jaina the option to flip cards if she played an attack doesn’t mean she has to attack. The only way for opponent to be safe from Jaina’s attack/dodge cards is to block so playing a starter throw can be better then playing the 6 attack to flip into Kneebash. The normal throw leads into more damage then Kneebash and any attack that would beat Jaina’s throw would almost always beat Kneebash. Once Jaina lets the opponent know she is willing to normal throw on Unstable Power turns that might make the opponent want to attack which would allow Jaina’s attack/dodge cards to become even stronger Unstable Power reveal cards.

To balance out Jaina’s strengths she has her own share of weakness. While she can get high damage of attacks her attacks that start combos are average speed or slower. Jaina is happiest when she can catch a throw with one of her attacks. This means Jaina will have to block/dodge to get rid of the opponents strong attacks and get them to want to attempt to throw Jaina.

Jaina’s throws are also average speed. Another downside to her throws is she can’t buy back cards when she starts a combo with a throw. Outside of aces Jaina can’t get a ton of damage off of throws at least not any where close to what she gets off of attack wins. To stretch Jaina’s throws out she has a stong ability on her 7 which is her fastest throw.

Jaina’s sub par throws could have make her very weak vs a heavy block/dodge range if not for two things: Jaina’s higher then average chip damage and the Smoldering Embers ability.

For every Smoldering Embers in the discard the opponent will take two damage every time they dodge. This is huge for Jaina. If she gets a couple of these in the discard the opponent really needs to make his dodges count and if Jaina catches a dodge with a throw all of a sudden Jaina is removing a large chunk of the opponents life that turn.

Smoldering Embers can play into Jaina’s late game of chocking out the opponent through doing good chip off of fast aces and if the opponent tries to dodge they take damage from Smoldering Embers.

Jaina does have her weaknesses but just like the others she has ways to play around those weaknesses.

Jaina is a character that wants to be aggressive, reckless, surround her opponent in a wall of fire. When you fight the Phoenix Archer you are going to get burned.[/details]

7 Likes

[details=Summary]Setsuki Hiruki is a Ninja student at the Fox’s Den. She must be at the top of her class because Setsuki is an extremely fast fighter. The speeds on her attacks and throws are faster then average. On top of this her innate allows her to start her offense faster then any one else.

Setsuki’s innate allows her to draw up to five cards is she starts the draw phase with one or two cards in hand. In addition when she does this if she dodges an attack that turn she can hit back with a full combo (with her 6 combo points!). This allows Setsuki to not care about the hand management that other characters have to deal with. She can start her rushdown offense right from the get go and keep on rushing down until the end of the game.

Both Setsuki’s normal attacks and throw speeds end in .2 which is fast. Setsuki will often be able to out throw the opponent and her normals will beat almost every one else’s normals. Setsuki’s two normal will even beat many face cards, wowow such a fast ninja.

Setsuki doesn’t stop the fast speeds at her normal moves. Her face cards are also faster then average. Her Esper Dash here is speed 1.4 that’s well below the typical 2.4 speed for Jacks. It is a 1cp linker meaning Setsuki can place this any where in her combo. This card is very helpful in emptying Setsuki’s hand (something she wants to do as often as possible) because it can string together normals that she wouldn’t have been able to get out of her hand otherwise.

Just because it is a linker don’t neglect playing this as a combat card. The speed of this card will beat out a lot of the opponent’s options.

Behold! the only speed 0.0 starter in the game. All other speed 0.0 moves are either enders or can’t combo. Having a 0.0 starter is something that is 100% unique to Setsuki.

This is one of Setsuki’s scariest cards in her deck. It kicks off her combo at the fastest speed possible. Even though it takes up 3cp Setsuki can still get a lot of damage out of the remaining 3cp.

Ninpo Flash only does 1 damage by itself but it can be pumped twice (discard two cards) for +4 damage per pump making this card top out at 9 damage. Now this kind of damage and pump inefficiency would be horrible for any one else but for the blindingly fast Setsuki it is actually a huge help. Remember since Setsuki’s innate triggers when she has 0 or 1 card in hand anything that helps her get more cards out of her hand (especially ones that won’t fit into her combo any way) is a good thing.

Setsuki’s K is an interesting and versatile card, it has two very different sides to it. The attack side is one of Setsuki’s most damaging cards at 2cp, it can do 11 damage. It does 5 damage to start and then can be pumped up to two times for 3 damage each. Again this would be bad for any other character but this is fantastic for Setsuki. The card is also a linker so it can help connect normal attacks. Starlight Kick is an all around great combo card for Setsuki, it does some of her best damage and it helps her get rid of her hand very efficiently.

Starlight Tumbler might not be as exciting but it has it’s uses. It is mainly used when Setsuki wants to Knock Down the opponent and set up a strong mix up next turn.

Setsuki would have had trouble dealing the high damage she needs to if it weren’t for her ace. The two attacks on this card have very different uses.

Surprise Gift is Setsuki’s most damage efficient move she will be using in a combo. It does 17 damage for two aces and only 2 of her 6cp. When Setsuki has two aces she because a lot more scary and any combat win off her fast throws and attacks will result in large damage. Setsuki can start a combat with Ninpo Flash into her 6 normal then finish with Surprise Gift for a total of 32 damage and this is starting off a speed 0.0 attack!! This is just the kind of super fast damage Setsuki can sneak in.

Shuriken Hail is a solid poke at the important speed of 1.0 it can be pumped with three more aces capping out at 36 damage. Since it is a single attack it makes it her best dodge follow up as well.

Setsuki always has tricks up her sleeve. When Bag of Tricks is the only card in her hand during the draw phase she can put any three non-joker cards from the discard on top of the deck, then she discards Bag of Tricks. Wow does this open up a lot of possibilities for Setsuki. Does she want damage? Put two aces and anything else on the top of the deck. Does she want a really scary mix up? Put a 7, Ninpo Flash, and Starlight Kick on top of the Deck. Bag of Tricks allows Setsuki to get the tools she needs to handle any game state.

The only downside of this card is that it’s on her 7 throw which is her fastest throw.

Setsuki can’t be caught off guard when she has her Smoke Bombs. This card allows Setsuki to counter an ability (not ones that appear on innates or aces though) at the cost of two cards. This is another card that would be bad for any one else but Setsuki. Getting to counter an opponents ability (a strong effect) and forcing Setsuki get rid of cards will get her closer to that important goal of ending as many turns as possible with 0 or 1 card in hand.

Just like every other character Setsuki does have weaknesses. For starters she only has 70 health, that’s as low as health starts in Yomi. Another weakness is since she is never building and managing a hand she’s always just trying to draw a new hand. This opens up more possibilities for drawing bad hands. But just like every character Setsuki has ways to mitigate these draw backs with smart play.

There’s Setsuki Hiruki, she’s a very fast Ninja Student, I’d hate to see what she’s like once she graduates.

If you want to play a rushdown character that doesn’t care about the usual hand management and just want’s to go on the offensive all day then you should check out Setsuki.[/details]

8 Likes

[details=Summary]Sirius Quince is Flagstone’s Chief Magistrate. He’s a man that is all about family and country. There are some that don’t like his rule but who cares what a highway robber, criminal lawyer, and stone golem think any way.

Quince is able to put a positive spin on anything. His innate (Positive Spin) allows him to reveal a face card from his hand when he dealt damage or block damage. If he plays that card next turn he can draw a card and rotate his combat card to the opposite side. This is huge because all of Quince’s face cards have two different combat options on either side.

Quince is a very slow character, the slowest in the game. However, once he can get his Positive Spins started he becomes deadly. If Quince can continue to win combats his Positive Spins can continue until the opponent makes the right call.

First off just to re-enforce how slow Quince is let’s take a look at his normal attacks and throws.

Both his normal attacks and throws end in speed .8 this is as slow as normal moves get. To top this off Quince’s 2 normal has a very powerful ability on it which means that Quinces fastest normal attack is 99% of the time speed 3.8

But Quince doesn’t care. He doesn’t need to be fast he just needs to deal damage once and then he turns into a monster.

Quince’s J is an attack on one side and a dodge on the other. Remember that all of Quinces face cards are built to make his innate awesome. When Quince activates his innate and reveals this card the only option the opponent has to be safe from losing to it is playing a block or dodge.

This is where Quince shines. If he reveals this card through Positive Spin both he and the opponent know that for them to be safe from it they have to play block/dodge this can open up Quince’s throw game and allow him to get some big wins with those slow throws.

This is Quince’s low risk low reward option because if played the opponent has no way to hurt Quince but it has the lowest pay off if it wins combat.

Slow Quince really becomes apparent with his Q. It’s a speed 7.2 attack on one side and a speed 9.8 throw on the other. Even though it is so slow this is a really deadly all around useful card for Quince. Righteous Zeal is great to play off of a dodge and Righteous Tumbler is fantastic for sticking on the ends of combos.

The Q is an interesting card for Positive Spin turns. If it connects it can do good to great damage but it is a risk to play because the way the opponent beats it is by playing an attack faster then speed 7.2. This leaves Quince wide open to getting smashed. Quince can beat this attack though by dodging it and then setting up another Positive Spin on the following turn.

Quince’s K is an amazing card for Positive Spin turns and it usually only gets better the longer the game goes on. The only way for an opponent to beat this card is by playing a throw faster then speed 9.0. Most characters only have two throw ranks faster then this so the more of those that hit the discard the stronger this card becomes.

Crosswise Toss can also lead to great damage. Crosswise Toss into a fully pumped Righteous Tumbler does 26 damage. That is outstanding for a card as effective as K on Positive Spin turns.

Another thing that is exciting about K as a Positive Spin card is that since it only losses to faster throws it opens up the opponent to getting hit be Quince’s slow attacks. One of Quince’s greatest wins is revealing K for Positive Spin then beating the opponents throw with Righteous Zeal.

While only a few characters can flip combat cards no one does it as often or as effectively as Quince. There is one thing that is 100% unique to Quince. He has an ability on his Patriot Mirror ace attack that when it deals damage or block damage Quince can play two combat cards next turn!!! You heard that right. he can play two cards. This allows Quince to do some pretty insane combinations.

The fact that Patriot Mirror causes Knock Down is fantastic for Quince. If it connects Quince can play an odd or even normal plus a dodge and he is guaranteed to be safe from the opponents option plus if his normal crosses up the Knocked Down opponent he can win the combat. There are several more strong Patriot Mirror card selections. 7 throw plus dodge is a particularly potent combo, especially if the opponent has played several of their 7 throws already. In some match ups the best the opponent can hope to do is tie with Quinces 7 throw. Depending on how many cards Quince has normal attack plus block can be good. With this option he is safe vs everything the opponent can do, he can still cross the opponent up but if they fast attack he gets to build up his hand.

Consent of the Governed is Quinces fastest attack at speed 1.2. It costs two aces and does 16 damage. It gets way better when Quince has three aces because the attack can be pumped with one additional ace for 14 more damage. Quince has many ways to connect into this attack. He can normal attack into it, play it in combat or dodge into it. It is usually a better card for Quince at closing out games because he will often want to use his aces for Patriot Mirror.

Quince is very card hungry. He needs lots of cards to be able to do what he wants to do. Luckily for him he has two abilities that get him more cards.

Two Truths is a very fun ability. When used Quince selects three cards from the discard of different ranks from 3 to K then flips over the top two cards of his deck. From these five cards he assembles two piles. Then the opponent selects the pile that Quince gets to add to his hand.

This card can let Quince get back any card he happens to need at the moment. He can get back valuable face cards to keep up his Positive Spin, get sets of cards to be able to power up, get back options that he might be missing, or just get cards that will let him deal the most damage. It is a very versatile ability. Often when the opponent thinks they have Quince on the ropes because he is low on cards he can play one of these and get right back in the game. No one can stop some one that has the truth on their side let alone two truths.

Quince has another ability that helps him get more cards. When Quince plays Flagstone Tax he chooses one of the combat options and if the opponent plays that option this turn Quince gets to draw two cards.

This is a great ability for Quince when combined with Positive Spin. It allows Quince to have a lot of fun messing with the mind of his opponent. He can select the option that would beat his Positive Spin card further reinforcing the idea that Quince will play the Positive Spin card but then he can be tricky and play the card that beats the card that beats his Positive Spin. Wow, Quince really creates a tangled web of political debate that few can handle.

As previously mentioned Quince is an extremely slow character, he’s the slowest in the game and that is his main weakness. When he isn’t doing Positive Spin or Patriot Mirror set ups he is usually at a disadvantage. He also hates KD probably more then any other character because being able to dodge into Patriot Mirror is one his main threats in the neutral game. To offset this Quince is at a big advantage once he triggers his Positive Spin or Patriot Mirror and once he triggers either of these once it is easier for him to continue to be in an advantage position.

Another weakness of Quince’s is that he is very card hungry. He needs a lot of cards to keep his game going and to deal lots of damage. Luckily for him he has many abilities that help him get more cards.

There you have the valiant leader of our glorious nation. If you want to play a character that is weak at the start of the game but then puts their opponent into a vortex of political spins and misdirection from which it is difficult for them to escape you should definitely look into Quince.[/details]

8 Likes

[details=Summary]General Onimaru is the military leader of Flagstone’s armies. Onimaru is a some what simple man. He is the only character in the game with 1 cp so he will never do combos but does do single big hits. And big hits for low amount of cards is what Onimaru excels at. He does extremely efficient attack damage.

His innate (Guard Crush) is also one of the most simple in the game. His normal attacks can not be blocked by normal blocks of equal or lower rank. This is pretty huge because Onimaru has attacks on his 8 and T rank. This makes it very scary for the opponent to use lower numbered blocks.

Onimaru’s normal attacks are very interesting because they all do 10 damage

What separates them though is how much damage they do on pump is determined by the rank of the card. Onimaru’s T attack deals a whooping 20 damage for two cards. This is very good and remember since the card is rank T it will also beat all the opponent’s normal blocks.

Since Onimaru’s face cards are so slow and he has no normal attack on his 2 I feel like two of his special abilities should be covered first.

The ability on the left, General’s Armor, says it can’t be interrupted by normal attacks except ones that knock down. This is a very powerful effect for Onimaru. It plays with his game very well. Since the opponent can’t reliably block to build up a hand they will sometimes normal attack to get cards from normal draw. General’s Armor allows Onimaru to stop these attempts right in their tracks.

The ability on the right, Final Authority, is one of the most powerful abilities in the game. If Onimaru combat reveals a face card he can discard the Final Authority plus a card with the same rank as his played face card. If Onimaru does this it Knocks Down the opponent (this is Onimaru’s only way to get a Knock Down) and his face card beats the opponents attack. This will even allow Onimaru to beat speed 0.0 attacks. On top of all that Final Authority can not be countered. Whatever Onimaru says goes and there is no arguing with the General.

Final Authority is massively helpful to Onimaru because most of his face cards are slow. This turns those slow attacks into the fastest attacks in the game.

Onimaru is a straight forward guy so not a whole lot to say about this card. It’s speed 3.4 does 10 damage plus another 10 damage for pumping with one additional J. This is Onimaru’s face card that while not having the highest max damage of his face cards does higher damage more reliably then the others.

Onimaru’s speed 0.8 Rising Sword attack is a useful tool in his kit. It allows him to beat out a lot of the opponents scariest combo starting options and is his attack that he doesn’t really need to wait for a Final Authority to come around.

Spirit Fire is Onimaru’s slowest attack at speed 4.0 but has the potential to do the most damage. This can be hard to pull off because Onimaru will have to sit around waiting for all the Spirit Fire cards to show up. If he does get all four though this card does 35 damage. That is solid damage for a character with only 1 combo point.

Onimaru has an army of robot soldiers at his command and this is represented through the Clockwork Formation ability.

The ace attack Clockwork Soldiers makes his scary face cards even more terrifying. It does 1 damage at speed 1.0 but if this card wins combat Onimaru can attach it plus any other aces he may have in hand to his character card. Whenever he hits with a face card he discards one ace and deals the opponent 15 damage. If his face card is blocked he discards an attached ace.

Clockwork Soldiers has several interesting layers to it. For starters it is a speed 1.0 attack which can be extremely helpful for Onimaru. It can be used to poke out aggressive opponents and keeps Onimaru safe. It is even more helpful when you consider Onimaru’s speeds on his other attacks.

Another point of interest is that the Clockwork Formation ability triggers as long as a face card hits. The face card doesn’t even need to do damage. So if Onimaru dodges an opponents attack with aces attached and they face down a card even if it is a Joker Onimaru can still do 15 damage to them if he follows up with a face card. No other character in the game can do damage to the opponent after they’ve face downed a Joker. There is no escaping the tactical and strategic genius of General Onimaru.

What is even more interesting about the ability is the fact that the downside of it (losing an attached ace if his face card is blocked) can actually be turned into a strength. The downside plays right into Onimaru’s innate ability. When he has attached aces the opponent might want to get rid of those attached aces by blocking but then Onimaru can just attack with high rank normal attacks and crush the opponent’s blocks. The cunning General must always be looking to turn weakness into strength.

The Marial Law attack can have it’s uses but Final Authority can’t be used on aces and the damage it does isn’t any more then some of Onimaru’s other attacks making the Martial Law side of the ace less used then the other. Do not write it off though, it can still be used to good effect.

Onimaru’s dodges must be mentioned. He has extremely good dodges. Since he only has 1 combo point he can still do his full “combos” off of a dodge.

It may seem that Onimaru is just a complete beast and that he is unstoppable. However, just like every character in the game Onimaru has his weaknesses too.

His throws are very weak both in damage and efficiency. His throws do damage equal to their rank and then can be pumped up to two times for 4 damage each. This means his fastest throw does 15 damage max for three cards, and none of his throws Knock Down the opponent. All this adds up to mean that Onimaru hates dodges. He can have a very hard time dealing with dodges and can be forced to play a patient game if he is dealing with a dodge heavy opponent.

There is an upside to his throws. His throws are actually quite fast and that is the one silver lining to his throws.

He is also slow if he doesn’t have any Final Authorities or he’s used them all up.

There’s the General. If you want to play a character that doesn’t fuss with combos he just hits with single cards for big damage and a character that turns combats that would normally have been a loss into a win you might want to give Onimaru a try.[/details]

6 Likes

[details=Summary]Troq is a well meaning minotaur that likes to smash things and drink lots of Giant Growth potions. He isn’t too bright so he lets smarter people do the thinking for him.

Troq’s like for smashing stuff really shines through his innate (Giant Growth). Giant Growth allows him to attach successful blocks to his character card (up to two) and for each card attached Troq’s normal throws and normal attacks do +1 damage. Once he has two attached blocks any further successful blocks will be discarded (Troq still draws a card though).

Troq is a Grappler and out of the Grapplers he has the fastest throws on average. His throws are very damaging when he is fully grown. Troq also has efficient face cards that have great utility. Troq just likes to play single cards or small combos for maximum smash effect.

Troq’s stature also comes through in the amount of HP he has. At 95hp he has the second highest starting health in the game.

The card on the left is Troq’s fastest normal throw and fast it certainly is. At speed 2.0 it will outspeed nearly every throw in the game. Troq also has high ranked normal attacks. His normals are slow however, ending in .8. What is especially exciting about Troq’s throws is it is his easiest way to take advantage of his innate. If Troq throws then follows up with an 8 normal and is fully grown he will deal 20 damage to the opponent. This is amazing for a Grappler with those blindingly fast throws.

Troq’s face cards all have great utility. For starters his J attack, Bull Rush, is the respectable speed of 2.2 at 7 damage for the single card. It is an ender so it will never do more then 7 damage but it can beat out a lot other attacks and allow Troq to put on some pressure.

Bull Charge is a lot slower at speed 3.4 but it does 10 damage. It’s main use most of the time is for sticking on the end of normal attack combos when Troq has no other follow ups or as a dodge follow up when Troq isn’t fully grown.

The cards utility doesn’t stop with just two different attacks. It also has the special ability Troq Armor (maybe Troq learned a trick or two from Onimaru) which allows both sides of this cards to beat faster normal attacks. This opens up Bull Charge to be used against characters that like to normal attack a lot.

The fabulous Up Hawk, Troq is so big and strong that he can fly for a bit (at least Troq thinks he can).

Up Hawk is a great card. The fast speed of 0.8 allows Troq to beat many scary combo starting cards which will keep him safe from aggressive opponents. It also does a decent 9 damage.

This is Troq’s fastest attack and will cause the opponent great despair as their high damaging options keep getting outsped.

Troq continues his domination of normal attacks with his Lockhorn Skewer throw. It’s special ability says it beats normals of speed 5.0 or faster. The opponent needs to attack with more then wimpy normals if they want to hurt Troq.

Lockhorn Skewer is a very good card. 15 damage on a speed 2.4 throw that grabs fast normals? Troq will take as many of these as he can get.

Troq keeps of the good speeds on his Eagle Totem ace attack. It requires two aces but does 20 damage and is at the all important speed 1.0. This attack is one of Troq’s scariest tools. The opponents fear of this attack can potentially allow Troq to get in more throw wins. When Troq is fully grown a throw win does just as much damage as the Eagle Totem so make the most of this threat.

Troq’s Beast Unleashed Super throw is his highest damage move (as it is will all Grapplers). It is a 0.0 speed throw that does 45 damage for three aces!! that’s a lot of damage especially since Troq can put the opponent in the deadly dodge/super throw mix up that if he gets right the opponent can’t do anything about it (unless they have a joker of course).

There is one downside to Beast Unleashed it requires Troq have two attached blocks and when he plays it he returns both attached blocks back to his hand. This means it takes awhile for Troq to set up Beast Unleashed and Troq very seldom gets a second chance to land Beast Unleashed if the first one misses.

Troq has one last ability, War Stomp, and this one isn’t a combat ability. During the draw phase Troq can discard this card to draw a card, Knock Down the opponent, and the opponent discards a card. Troq can not use this ability if he himself is Knocked Down.

This card is fantastic. It has the Troq theme of lots of utility. Being able to draw a card is good, Knocking down the opponent is good, making the opponent discard a card is awesome. War Stomp allows Troq to put serious pressure on the opponent and if he stores a lot of them up he can play them all at once and wreck the opponents hand. This works especially well if the opponent has gone very low on cards or if they’ve just spent a lot of cards to power up.

The downside to it is it’s on a dodge card. Troq is already low on dodges to begin with. He has 8 total dodges in his deck and this amazing ability is on half of them.

Troq is not without his weaknesses. As said before he doesn’t have many dodges. Also even though his face card attacks have great utility and solid speed they only deal 7 and 9 damage. Which is a lot lower then other characters can get off of their combos that connect.

Troq also has a hard time building a hand. His innate is both a blessing and a curse. It is good for the first two blocks but after that it is just hurting Troq’s hand building. This translates into it being harder for Troq to get his very valuable aces (because it is harder for him to power up) then every other character in the game.

There you have Troq Bashar. If you want to play a character that just likes to smash stuff with very strong throws and don’t mind the hand building weakness you should give Troq a try.[/details]

7 Likes

[details=Summary]Bal-Bas-Beta is a steam powered robot with A.I. that is searching for his banished creator (Geiger) to discover his purpose.

Bal-Bas-Beta(BBB) has the longest innate ability in the game. It allows him to place the opponent at range if his ranged moves (normal attacks and Extensor Grab) are blocked or win combat.

While at range BBB’s normal attacks become speed 1.0 and if the opponent hits with an attack it does 0 damage but range ends. If both BBB and the opponent play blocks range ends. On top of that only range throws can be used at range. The only range throw in the game is Extensor Grab. Also the first face card that BBB plays each turn returns to his hand after combat.

BBB is a little confusing to sort out at first but becomes easy after several plays. Altering combat to this degree is something that is 100% unique to BBB.

BBB is a character that want to be safe at range, having strong efficient options while the opponent is forced to play a deadly guessing game that even once they get it right it just allows them to start playing normally again.

Range actually makes BBB’s health of 80 a lot higher then it appears at first look. BBB also only has 2 combo points. This means he will never get straights of normals. Outside of that it doesn’t hurt him a whole lot because he has a lot of moves that are only 1cp.

Luckily for his opponents BBB has slow normal attacks. They end in .8 making it difficult for BBB to actually get to range in some match ups. He sometimes has to play a defensive game waiting for the opponent to throw or block in order to get to range.

While BBB’s normal attacks are slower then normal his throws are a bit faster then average. His throws ending in .4 is faster then the standard .6 speed. This can make BBB’s 7 throw a strong option (pictured later). BBB’s throws do not Knock Down though. It is actually rare for BBB to Knock Down the opponent.

Cog shot is the standard 2.4 J speed. It does Knock Down (one of his two cards that does) but it is a Starter which means BBB will often just combo instead of taking the Knock Down. This is a great card for BBB and can defend him against the opponents trying to outspeed his slow normals.

Long Arm may not seem like an option that would ever see much use but it becomes great when combined with his special ability Overdrive (covered later). Long Arm is also a linker which allows him to stick this card onto any combat win if BBB doesn’t have anything better.

Junkshot attack can only be used at range. It is at speed 2.2 which since it can only be used at range means it is actually one of the slowest moves BBB can play at range. Even so it can be a deadly card. It does 13 chip damage meaning BBB can really grind the opponent down if they keep blocking this card.

The other side of the card is Gyro Spin which can’t be played at range at all. It is a card that allows BBB to get a lot of damage on any combat win that can combo. The 5 damage +5 damage for up to two pumps is inefficient but if BBB’s hand allows it can get in some good damage. BBB can throw into a fully pumped Gyro Spin for 22 damage or Cog Shot into it for 23 damage.

Extensor Grab is BBB’s only non normal attack that can get him to range. It is the only throw in the game that can be used at range. It is also BBB’s only way to reliably get a Knock Down (since it can’t combo whenever it wins combat BBB will Knock Down the opponent). All this makes Extensor Grab an immensely important card for BBB.

What’s funny about the card is even though it is a speed 8.6 (a so so speed) at range it might as well be speed 0.0 because the opponent can’t play their throws. This means that BBB at range can play a block/dodge or Extensor Grab mix up and forever stay at range if he keeps getting it right.

The Knock Down is very strong at range because it allows BBB’s now fast speed 1.0 normal attacks to cross up the opponent.

BBB becomes totally crazy when he goes into Overdrive. When he plays this card it makes: -All his face cards deal +3 damage
-Long Arm (Jack) can’t be interrupted except by Knockdowns
-Junkshot (Queen) is unblockable
-Extensor Grab (King) sets range even if it hits after a dodge.

This makes the previously useless as a combat reveal Long Arm attack an amazing combat reveal that now does 10 damage. This can lead into very strong damage if followed by a full pumped Gyro Spin because that will do an extra +3 damage as well. This makes the full combo do 28 damage.

Junkshot being unblockable allows BBB to but immense pressure on Knocked Down opponents at range.

Extensor Grab clause allows BBB to play a throw/dodge mix to get to range now. However, because of the slowness of the throw BBB must include normal attack into that mix up.

Taken all together Overdrive turns BBB’s face cards into absolute beast mode cards.

BBB doesn’t have any fast attacks on his face cards or normal attacks but it is his ace that comes to the rescue.

Beta Thrust is a speed 1.4 single ace attack that does 11 damage. It is also an ender which means BBB can stick this onto almost any combat win. The speed 1.4 is great for keeping aggressive opponents off of BBB.

Piston Hurricane is at the very impressive speed 0.2 (especially considering how slow everything else is). It is a two ace attack that deals 21 damage and can be pumped with up to two more aces for 7 damage each. Piston Hurricane is BBB’s end game move. He builds up a hand very fast at range then when he drops out he should be able to power up for several aces and scare the opponent with this deadly fast attack. The pump is very inefficient and should really only be used if it will kill the opponent. The only downside of Piston Hurricane is it can’t be played at range.

BBB has one last deadly ability, Robo Headbutt. If this attack wins combat BBB can play another full combo! That is can do a ton of damage even for a character that only has 2cp. Robo Headbutt by itself does 10 damage making this card on win realistically deal up to 40 damage (Robo Headbutt into two fully pumped Gyro Spins). That is just amazing for a character that normally does low to medium amounts of damage.

BBB has his weaknesses too. He has a low amount of dodges. Only 8 in total. He is really slow outside of his aces which makes him very vulnerable if he has no aces. He can also die very quickly if he doesn’t ever get to range.

There’s Bal-Bas-Beta. If you want to play a character that can set combat to range which allows you to play a very safe game, a character that has slow attacks normally but very strong aces and abilities then BBB might be the character for you.[/details]

8 Likes

[details=Summary]Master Menelker is an all around fighter like Grave Stormborne, he is also Master Midori’s brother. However, Menelker has many differences from Grave. He is tied for the lowest amount of health in the game but to compensate for he can deal a lot of damage and his innate, Bleeding Wounds, gives him disruption and card draw effects. In addition to drawing cards and forcing discard when Menelker hits with his black face cards he can also power up for black face cards. This allows him to have the tools he needs for any given situation and be able to protect his low life total.

Menelker has average speeds on his normals and throws. He also has the standard number of normal attacks, normal throws, blocks, and dodges. This goes a long with his all around fighter status. His normal stuff isn’t slow but it isn’t fast either.

Chaos Orb is the standard J attack. It has the usual speed of 2.4 and does a solid 7 damage for 1cp. Black J is a whole different beast. Menelker can stick it at the end of any combo for essentially free damage and card loss to the opponent. Getting 7 damage for free is very nice and it easily fits into any combo. If Menelker plays throw then J he goes card even for the turn and does 13 damage. If he normal attacks into it he goes card positive and still gets in damage.

The other side of J is Nether Orb. because of this attacks speed it is mainly used as a dodge follow up or to get a big punish on the opponent if Menelker suspects they will throw. It does 27 damage if Menelker can pump it up with two more Js. Just make sure to lead with the Black J in order to get those extra cards and cost the opponent a card.

Rising Dragon is Menelker’s reversal. And what a reversal it is. At speed 0.0 is will beat or trade with every other attack in the game. It can also do a total of 16 damage if Menelker pumps it with two cards. This is good damage for such a fast attack. Menelker does need lots of cards to do his biggest and strongest combos so pumping it might not always be the best choice.

It is no surprise that Black Q takes a great card to a whole new level. The same great stats plus card draw for Menelker and discard for the opponent. This means if Menelker hits with Black Q and doesn’t follow it up he will have gone card postive for the turn all from behind the comfort of a speed 0.0 attack.

Being able to power up for Black Q is a great tool for Menelker. It allows him to be safe and threaten a 0.0 speed attack almost whenever he needs to. Use this tool to your advantage whenever you can.

Now here is where Menelker gets some of his crazy high damage. Sweeping Claws can do up to 16 damage using only 2 of Menelker’s 5 cp! That can lead into insane damage. Take a couple of example combos

(+ means the card is pumped once ++ means the card is pumped twice)

K++K++J = 39 damage. This does cost Menelker 7 cards to pull off… but only if all those face cards were Red. If all of them were Black it would only cost him 4 cards to do 39 damage!!! and in addition to that the opponent is now down 3 cards which will take away their damage potentially keeping the low life (in health terms, I’ll leave the ethical quandaries for you to decide) Menelker safe from the opponents big combos. If Menelker hits with this all Black combo and both he and the opponent have 8 cards at the start of turn then at the end of the combo Menelker will have 4 and his opponent will have 5. This is pretty insane considering how much damage Menelker just got to do.

K++6A+ = 44 damage. This combo doesn’t have the potential for lots of card draw and discard that the previous combo does but it does do 5 more damage which give Menelker a greater kill range off of attack. Also, sometimes Menelker just doesn’t have all the Ks he wants to have.

What is even more impressive about this damage and card antics is that it all starts off of Sweeping Claws very respectable speed of 2.2.

If you thought that Menelker’s only way to mess with the opponent’s cards was with Black face cards you’d be mistaken. If Menelker throws the opponent with Bonecracker (either by playing it face down and winning or dodging into it) he gets to look at the cards in their hand, already this would be a stong effect but it doesn’t end there. He then gets to chose a card from their hand and discard it! This is massive. It allows Menelker to remove Jokers, get rid of aces, or remove any one of the opponents strong threats. It has other applications as well but the previously mentioned ones are a good starting point.

Bonecracker becomes even more of a headache for the opponent when it combos into Black face cards. Since it only takes up 3cp Menelker can combo into J or K which if the card is Black will make the opponent lose even more cards.

The disruption doesn’t even end with Black face cards and 7. Menelker has one final way of messing with his opponents cards and it is found on his T. The ability is called Into Oblivion. It allows Menelker to chose a card in the opponents discard and banish it (remove from game). The opponent then has to banish another card of the same rank from their hand or deck.

This ability gives Menelker great utility. A lot of people would have to worry about scary multi ace super attacks like Grave’s True Power of Storms or Midori’s Final Dragon Buster but Menelker can completely remove these threats. If the opponent keeps an ace in his discard pile (they have a chance to get it back in the power up phase which will happen before this ability can be used) Menelker can target that ace with Into Oblivion and get rid of two of the opponents aces. Then he no longer has to worry about those high damage frightening attacks, making his 70 health feel like more then it would otherwise.

Into Oblivion can also be used against Jokers. This is incredible for Menelker because he no longer has to fear the opponents bluffs (in fact the opponent they wont ever bluff after their jokers are banished) because they no longer have access to any Jokers. This makes Menelkers high damage combos even more deadly to the opponent.

The potential uses for Into Oblivion are many and varied. Just remember that if you banish a card in the discard that isn’t something the opponent can normally get out of the discard you are actually only denying them access to one copy of that card.

Menelker is another character with a versatile ace. The attack side, Dragon Breath, can be stuck on the end of any combo for great damage. Throw A+ will deal 27 damage. It can also be used as a fast single ace poke to deal with attacks that would beat Menelkers K. While not as fast as Grave’s single ace attack it does have higher top damage if Menelker has two aces in hand. At speed 1.2 it is as fast as a lot of the standard double ace attacks but Menelker only has to risk a single ace if the attack misses.

The throw side of Menelker’s ace is his biggest damage move and is the biggest damage that can be done in the game. It requires 4 aces but with it being a throw at speed 4.6 it will be the fastest throw in most match ups. What makes this even more impressive is Menelker can get rid of the opponents Jokers using Into Oblivion. Once Menelker has done this he can either play Death Strike Dragon or dodge (in most match ups) and if he gets it right there is no way for the opponent to escape taking 55 damage. Death Strike Dragon indeed.

So there you have Master Menelker. He is a high damage versatile all around fighter with lots of card disruption. If you like the idea of being able to deal damage while reducing the amount of damage the opponent will be able to deal to you and you don’t mind his only main down side of being tied for the lowest health in the game then check out Master Menelker.

Warning: I’d recommend that you do not use Menelker in friendly games against people that are new to Yomi. His discard antics can be no fun for people to deal with when they are just trying to understand what the game is even about.[/details]

6 Likes

[details=Summary]Mistress Persephone is an interesting character, both in terms of gameplay and fluff. In the fluff she is a powerful being that watches over the world helping those she deems worthy of her help. When helping others she enjoys causing them some sort of pain (for example Persephone was the one that gave Degrey his ghost companion. This ghost watcheds Degrey and makes sure he completes his mission. The ghost enjoys tormenting Degrey). In the game she wants to control the opponent. She wants to keep them on the ground and take over their ability to play their own cards.

Persephone is a vortex character. She can take a bit of time to get going but once she does she is in an advantaged position. Taking a look at her innate, if you knockdown (KD) the opponent she gets to retrive a non joker card from the discard but if they were KD last turn she gets the huge pay off of getting to select 4 non joker cards of different ranks. Her hand can quickly go from small to huge if she gets a couple of KD back to back. This innate is extremelly versatile because she can use it to get her strongest throws, ability cards, aces, and whatever else she happens to need such as getting a card to make a pair or triple for power ups.

First I’ll go over her normal attacks and throws then I’ll get into some of her great cards that Persephone will be able to recur.

Persephone’s normal attacks are above average on speed. Having a 2.4 normal attack is quite handy to be able to start straights to get aces or to get various other early game combos going.

Persephone’s throw speed can be deceiving. While she does have the average speed at x.6 she will often be getting her 7s back from the discard. This means that once the opponent has ran themselves low on their 7s Persephone can continue to get hers back making her 7 throw more and more dominating as the game goes on. Also of note is Perse has no ability attached to her 7. Making this card’s only purpose the throwing of the opponent.

In the early game Persephone will usually not want to follow up her throws. She will want to take the KD in order to make use of her innate and put her opponent in a precarious position.

Another game mechanic that Persephone approaches differently then the other members of the cast is powering up. Perse will want to power up early to gain acces to her awesome aces. Unlike other characters Perse usually doesn’t have to worry so much about what cards she powers up with. Thanks to her innate she can get these cards back if she can get the KDs. It is not good to power up if Perse will cripple her hand. Taking advantange of her innate and powering up is something strong Perse’s will have to learn.

Alright now lets get into those lovely face cards

Power Lash is an important early game attack. If the opponent can outspeed Perse on throws it allows her to still get a KD by Power Lashing their throws. It is also a great dodge follow up. It gets a solid 10 damage and the precious KD. It is a slower move at speed 4.0 so Perse needs to be confident that the opponent will play a throw when she face downs this attack. On the brighter side of things it isn’t such a slow attack against a lot of the characters that can outspeed her throws. Learning what match ups Power Lash shines in and when to play it is another step in becoming a strong Persephone.

Rapid Lashes is typically an end game move. It doesn’t KD so Perse really only wants to use this at the end of combos if she doesn’t have KD or if she can kill. Rapid Lashes does 15 damage when fully pumped making it Perse’s most effeceint combo point to damage card. This card becomes a lot more important when the opponent is under the effects of Mistress’s Command. More on that later.

Rising Pleasure is Persephone’s reversal. At speed 0.2 it is useful in keeping her safe from the opponents more threatening combo starting attacks. It doesn’t KD or help with her standard gameplan in any way. It is just used as a safe option.

It does allow Persephone to keep up her offense and be more scary to the opponent when they are at low life so it is still a great card even though it doesn’t tie directly into her plan A. It is a good card to be able to recur.

Persephone gets back to her plan A with Wild Ride. Having another rank of throw is very good for the KD Queen. She wants to keep the opponent flat on the floor as much as possible. At speed 8.0 it will often be the second fast throw in a match up. Much like her 7 throw it will get stronger every time the opponent uses one of their 7 throws. Wild Ride does 9 damage, 2 more then her standard throws, giving her better top damage on her throw and KD combos.

This is a great card to recur especially in mu where the 7.6 speed of her 7 throw and 8.0 speed of Wild Ride do not matter.

And we finally come to Persephone’s ace

Behold! Mistress’s Command is a card that will often generate some anger from the opponent but Persephone doesn’t care. She just revels in their anguish. Mistress’s Command’s ability is one of the most wild abilities in the game. If Mistress’s Command wins combat and deals damage Persephone gets to control the opponent’s next turn!! This is so, so good and it allows Perse to get rid of the opponents strongest cards in their hand. It can also set them up to lose several more turns if they get caught missing some options.

If the opponent is hit by Mistress’s Command, they don’t have a joker, and they only have 30 HP remaining Persephone can then win the game. She can make the opponent face down a block/dodge and then K6J++ for a total of 30 damage for the win. She can actually kill from higher life totals against certain opponents but more on that later.

The other side of her ace is the very appropriately named AA attack, On Your Knees. On Your Knees is a fast attack at speed 0.4 which will cut under a lot of the opponents attacks and allow her to get a KD dealing a solid 16 damage and beating a lot of the opponents attacks. It is also a 2cp ender. This allows her to put it into throw combos and get more damage (23 or 25) and the KD.

On Your Knees is the move that makes Persephone’s vortex scary and work well. She always wants to make sure she has at least one ace in the discard to be able to get it back through her innate. It is crucial that she is able to have On Your Knees in her had a lot during the mid and late games. Once she gets back to back KD she will want to get an ace plus some cards that will allow her to power up for the second ace so she can continue to put the pressure on the opponent.

Now on to Persephone’s abilities

Do As Told is a soft counter. Persephone can play this card to try and counter an opponent’s non ace/innate abilities. The opponent has a choice when Perse plays this they can either except the counter or take 10 damage to make their ability uncounterable. The opponent thinks they are in control when Persephone plays this card but really it’s Perse who has control because no matter which option they take Perse is a happy Mistress.

This card actually makes Persephones health not seem so low. Since the opponent will usually have to pay at least 10 life to trigger an ability through out the game it seems as if her 75 health is decent instead of low.

Thanks to Persephone’s Innate she doesn’t have to be as careful with her counters as other characters. She can try and counter a lot of abilities through out the game and then get back Do As Told through use of her innate.

Do As Told goes so amazingly well with Mistress’s Command. On turns that Persephone has taken control of the opponent she can make them use all their draw phase abilities and make them pay the 10 life which can give her a pretty obscene kill range. Even if it doesn’t put the opponent into kill range Perse can still make them waste all draw phase ability cards.

Bare Your Soul is another card that pairs so well with Perse’s kit. When Perse plays it she gets to flip the top three cards of the opponents deck face up onto the table. Whenever the opponent gets to draw a card Perse can chose one of those cards for them to draw. She can chose none and discard all remaining cards and then they draw one from the top of their deck. She can only ever have three cards up on the table so if she plays multiple copies she has to discard down to three. This isn’t a bad thing. It is actually good because it allows Perse the opportunity to kill key cards. If the opponent powers up for an ace from the deck while any cards are face up on the table they shuffle those cards back into the deck. Because of that it is often good to have two Bare Your Souls lined up so Perse can remove strong cards (like Jokers) before the opponent has the chance to shuffle the cards back into their deck.

Bare Your Soul makes hitting with Mistress Command even better. If Perse has Bare Your Soul up and then hits with Mistress’s Command not only will she know what is in their hand she will be able to control what they draw. Their is no escaping the will of Mistress Persephone.

The Bare Your Soul plus Mistress Command combo gets even better if Perse can deprive the opponent of an option. For example if Perse can run them out of blocks she can play On Your Knees all day until the opponent just pleads for Persephone to end it all.

Bare Your Soul still has strong uses out side of getting perfect information. Being able to kill attacks faster then On Your Knees’ 0.4 is quite handy as well.

Of special note: both Persephone’s special abilities are on her slowest throws which allows her to use them purely as abilities and not worry about losing strong cards.

There you have Mistress Persephone the Nox Oracle. If you want to play a vortex character that tries to control the opponent and keep them on the ground all the while being able to recur your best options then definitely check out Persephone. Like all characters she is not with out her weaknesses. She has the potential to die fast. Her vortex can be tricky to get going and if it never gets going she is in a lot of trouble.

Warning: I’d recommend that you do not use Persephone in friendly matches against people just learning the game. At this point they will be working on just figuring out what they are supposed to be doing and Perse’s abilities and play style might cause them to fly into fits of rage if they don’t know what she is about.[/details]

6 Likes

[details=Summary]Rook is a stone golem (he wasn’t always a stone golem) that started and Runs the Fantasy Strike tournament. He is usually nice and gentle but can become a fierce fighter when he needs to be.

Rook is unique in many ways. He has no dodges and he has the most HP in the game. There are other unique things about the Stone Golem but the mentioned things will become apparent very quickly.

Rook’s innate ability, Rock Armor (RA), helps with the fact that he has no dodges. It allows him to hit with his normal attacks that get outsped by the opponents normal or special attacks (so ace attacks will stop RA attempts) and finish his combo as long as he wasn’t KD at the end of the opponents combo. In order for Rook to do this he has to discard two cards of the same suit as his original attack. RA doesn’t count as Rook “winning” combat so he will not benefit from normal draw when does it. Special note: the opponent will still get to finish their combo so if they can kill Rook then that will be the end of the game.

Thanks to RA, Rook (as long has he has the hand for it) can just laugh at the opponents reversals. All those 0.0 fast attacks that deal around 10 damage that every one else has to play around Rook can just not care and play a slow attack take his 10 damage and RA to deal 20-24 damage. The fact that Rook has the most HP in the game helps with this greatly. Rook can’t be afraid to make the occasional combo trades in order to deal large chunks of damage.

Just because Rook doesn’t have to fear reversals it doesn’t mean he has nothing to fear. Aces and attacks that KD are more of a problem for him and it is what Rook will have to be on the look out for. Knowing what opponents can end a combo with KD and which opponents are strong at avoiding RA is a big step in becoming a strong Rook.

In order to do solid RA combos it takes 4 or 5 cards (2 cards of same suit to discard plus 2-3 played in combat). This means that Rook wants to build up a hand in order to threaten scary RA combos. Luckily Rook is a grappler which means he has fast efficient throws. Rook will often be outspeeding his opponents throws with his. This means that Rook can play a strong Throw/Block game. He blocks to build up to aces and other strong options and throws to protect his throws and stop the opponent from building up their own hand.

Let’s take a look at some of those fierce throws.

Rook has some throws on his lower ranked cards. His two throw comes in at the extremelly fast speed of 2.0. That will beat all but one normal throw in the game (it will tie with that one throw). His slowest fast throw is on his 7, at speed 7.0. This may seem slow compared to his two but it is still faster then most characters fastest throw.

Rook will use his throws to protect his blocks. His throws are can’t combo so he will only ever be getting 10 damage off of his normal throws. This may seem weak but one card for 10 damage is solid and his hand size will never shrink when playing a normal throw.

The last thing of note about his throws are that like most throws they knock down (KD). Since they are can’t combo moves when Rook’s normal throws win they will always KD. When the opponent is KD it puts Rook in a very strong position because now all of the sudden his normals backed up by Rook armor have the mix up normal rule working for them. Rook is a lot more scary to the opponent when they are KD. He can play the very effective odd/even normal or block and be able to deal with anything the opponent has.

Speaking of blocks Rook has some special blocks available to him.

When Entangling Vines blocks an attack it cancels chip damage, KDs the attacker, and deals 5 damage to them. When it does this Rooks attacks and throws are 3 speed faster next turn to a minimum of speed 1.0. Whenever Rook plays this card he will discard it no matter what happends.

Since Rook always looses this card when played and it deals damage when attacked it acts as a pseudo dodge for him.

The KD plus speed 3 faster moves make Rook even more scary to the opponent. Rook’s face card attacks now become speed 1.0 and his fastest normal goes from 4.8 to 1.8. Blocking an attack with Entangling Vines can really open up what Rook can do and give him a turn to put serious pressure on the opponent.

Entangling Vines can be an important part of the mix up when you are going for RA and the opponent is already KD. In this situation you opponent might want to play their ace attack in order to stop RA but if Rook sniffs that out he can play Entangling Vines and completely stuff their ace attempt and put them in a situation that is worse then they were on the previous KD.

Depending on how much damage the opponents ace attack does Rook might want to consider playing his other special block.

Stone Wall reflects an attack’s damage back to the attacker (Rook takes no block damage). No matter what happens when Rook plays this card it is discarded. This means if the opponent plays one of their fancy double ace attacks Rook can lay down Stone Wall and send that 20 damage right back at them.

This is great for Rook since he doesn’t have any other way to deal with fast super moves outside of blocking them. It also means that whenever an opponent does have a three or four ace ultra attacks and Rook has Stone Wall in hand it is almost like Rook has access to that same high damage ultra attack.

Stone Wall is very valuable to Rook. He will want to save it when the opponent is actually threatening something that deals high damage.

Now that Rook’s blocks and throws have been covered we can move onto his attacks. Let’s start with his normal attacks.

Rook’s normals are slooow. The above attacks are speed 6.8 and 10.8 (the slowest normal attack in the game). This doesn’t bother Rook so much though because of RA. The above cards are really good for RA attempts. The 6 because it leads into Rooks highest damage straight (678 for 21 damage and Rook gets an ace) and the T because it is the normal that leads into the highest damage (TJT for 24 and TQ+ for 24).

The T attack is a really bad attack if Rook doesn’t have RA to support it and the T throw is an awful throw so T should mostly be used for RA or in combos.

Another card that is important for RA is…

Rook’s 7. It is important because it is Rook’s only odd attack that doesn’t have an ability tied to it. Rook needs his 7s to be able to threaten an odd/even mix up on KD opponents.

Thunderclap is a very solid card for Rook. It has a couple of uses. It can either be used to link Rook’s high normals together or played as a combat card itself. The 2.2 speed is fast for Rook and it will undercut a lot of attacks the opponent will try and bully Rook with. It leads into respectable damage when played as a combat card. JT = 14, JQ+ = 18, J78 = 19

Rook’s Q allows him to get solid damage off his attack combat wins. It will mostly be used to tack on to combos for the damage but in some match ups against slower opponents the 2.6 speed of Hammerfist can be a pretty good combat reveal.

When Q is put into a combo the choice of which side to use will mostly be about does Rook have the cards to spend on the pump. If he does Hammerfist is the better side, if he doesn’t the Rolling Stone is the better side (there are a couple of match ups where Rolling Stone will be the better side even if Rook has extra cards for the pump).

Windmill Crusher is an awesome card. 15 damage for a single card is great and it has an ability which says: this beats normal attacks of speed 5.0 or faster, but you still take damage from the normal attack.

This card is fantastic for a grappler. Since they have fast throws and defensive mastery the only way for the opponent to get cards and be safe from throws is to normal attack Rook’s throws. This would be true if it wasn’t for Windmill Crusher. This card can be used on an opponent that is getting overly aggresive with the fast normals or one that is low on cards or if they have a bad hand. When Windmill Crusher is played it gives Rook insurance vs blocks, dodges, throws, and fast normals. This is an insane amount of coverage.

Now RA isn’t the end all be all for Rook. He has other options as well. Some of these other options are found on his ace (of course he can do a mixture of his options which is usually best). Rooks AA attack, Wall of Vines, is very impressive at 20 damage and speed 0.8 it is going to beat a lot of attacks and deal a solid amount of damage.

Having Wall of Vines in hand can open up Rook’s game even more. The opponent might try to block it which allows Rooks throws to shine, they might try to undercut it with a fast reversal which will allow RA to shine, or they might try to undercut it with a faster ace move of their own which allows Stone Wall to shine.

The other side of Rook’s ace, Checkmate Buster, is a four ace ultra throw. At speed 0.0 it is tied with the other grapplers for fastest throw in the game and it does 50 damage!! Since Rook has no dodges he has to just straight up play it in order to hit with it and again since Rook has no dodges the opponent can be 100% safe from it by attacking, but any other option will lose. All this means that Rook can only ever connect with Checkmate Buster if the opponent shows him no respect and tries to throw him or block/dodge his attacks. If the opponent shows Rook nothing but respect and does nothing but attack since he’s gotten Checkmate Buster he can play Wall of Vines instead. Getting a feel for when opponents will disrespect Checkmate Buster is a big part of becoming a strong Rook.

Well there you have Garus Rook. RA, his fast throws, reflecting attacks, poweful aces, and highest health in game may make him seem very strong but he does have his weaknesses as well. He has no dodges, he doesn’t have any fast attacks outside of Wall of Vines, He can struggle vs attack spam, and single ace attacks can ruin his day. Having said all that if you want to play a more strategic game opposed to a more tactical one and you like his strengths and don’t mind his weaknesses I’d strongly recommend you check out the lovable Stone Golem.[/details]

6 Likes

[details=Summary]Degrey is, depending on who you ask, a troublesome lawyer or a fighter for truth and justice. He is very old (100s of years) and has a ghost (given to him by Persephone) companion that follows him around and makes sure he completes his life’s mission.

Degrey’s innate, Moral High Ground (MHG), says: If your opponent has more cards in hand then you, your special attacks (face cards) and super attacks (aces) deal extra damage equal to the difference. This means that Degrey likes to play on a lower hand then other characters in order to give him even greater Moral High Ground. This can also be dangerous for Degrey because his cards don’t chain together that well. There is definitely a trade off to consider for Degrey on whether to go super low hand for huge damage on win or medium hand for some options but less benefit from his innate.

His innate makes him one of the better characters at playing with only 2 or 3 cards in hand.

Degrey has average speed normals. His 2 and 3 are both named attacks Spectral Pull/Push respectively. The only difference from other normals of these ranks is they do 4 damage instead of 2 and 3. What is bad about these normals is Degrey doesn’t have a 4 normal so he can not chain them for aces. He also doesn’t have a linker to connect them into higher normals. When Degrey uses these normals it is more to connect into J or AA (23AA is 28 damage even before his innate kicks in).

Degrey has slow throws. His throw speed ends in .8 which means his throws will often get outsped by the opponents throws. There is an exception to this and that is found on Degrey’s 7

His 7 has an ability on it Point, Counterpoint that allows Degrey to discard a card to rotate the card 180 degrees.

If Degrey plays this card and the opponent does anything but attack with a 7.4 speed move or faster then Degrey wins that combat. It is common for Degrey to lead with the throw side because if the opponent throws and out speeds him he can discard a card to rotate then the normal attack will hit and draw Degrey a new card to replace the one he discarded.

This card pairs amazingly well with Degrey’s ace (more on that later). It goes just as well with another one of his abilities…

Troublesome Rhetoric allows Degrey to choose one of the combat optionss. If the opponent combat-reveals that option then Degrey gains 12 life.

This is a pretty solid ability. It can allow Degrey to put his opponents into a box in which there are no really good options (generally).

What option to pick depends a lot on the situation and the opponent’s character. A typcially strong option is picking attack. The reason it is strong is because it pairs very nicely with Degrey’s Point, Counter Point ability. The opponent either has to attack and give Degrey 12 life or not attack and lose to Point, Counter Point. Once Degrey gets the opponent thinking they will follow up Troublesome Rhetoric with Point, Counter Point he can get them with the ultimate punish by ace dodging (more on that later) their attack. This will allow him to hit back with a full combo and get 12 life!!

Just looking at the card itself Daggerfall Thrust is a pretty standard J attack. It has the usual 2.4 speed and does some what typical 7 damage. It is also an ender. What sets this card apart is Degrey’s innate which can allow it to do cray damage for a single card. It is a good card for putting on the end of a throw win or normal atttack win.

Throw + 6 + J = 21 + MHG

Now Pilebunker is pretty bonkers. It is terrifying to be on the receiving end of a 14 damage starter that KDs and will benefit from MHG. The downside of this card is that it is speed 7.0. It will lose to a ton of attacks. It pretty much only wins if the opponent tried to throw Degrey. So in order for Degrey to be able to connect with this card he has to make a strong read. Being able to read the opponent is what being a lawyer is all about.

The opponent being uncertain of whether Degrey will play Pilebunker or dodge into it might make them want to block just to be safe. This can open up Degrey’s range and allow his slow throws to be successful.

Spirit Justice is Degrey’s reversal. It is at the great speed of 0.2 and does the standard 10 damage for a reversal. It does however benefit from MHG so it is the most efficient reversal in the game. Being able to deal 15 or more damage off an attack this fast can be very satisfying to Degrey. Degrey must feel pretty smug when he blasts the opponent with his Spirit Justice.

This is Degrey’s only fast attack. It is usually best to save Spirit Justice to beat out the opponents attacks that range from speed 0.4 to 1.0. Degrey is also bad when he is knocked down so having a K in reserve for those situations will make the opponent think twice before trying to cross up Degrey with a normal attack.

Behold! Not many cards in the game will get the kind of emotional reaction out of the opponent that Ghost Riposte will. Ghost Riposte’s ability says when you dodge an attack or joker with this you may hit back with a full combo. Return this card to your hand when combat ends unless you were thrown.

That ability is so incredibly strong especially for a slow character like Degrey. Ghost Riposte allows Degrey to deal with fast attacks like no other character, he can just dodge them and hit back with a full combo. This is bosltered by the fact that Degrey’s combos hit like a freight train.

Combos like Q + AA = 34 + MHGx2 or Q + 6 + J = 27 + MHGx2 are pretty shattering to the opponent.

The fact that it returns to Degrey’s hand at the end of the turn makes it even more incredible. This constant threat is what will make the opponent want to throw Degrey which will open them up to getting slammed by Degrey’s slow powerful attacks. Point, Counter Point goes very nicely with Ghost Riposte. The only option the opponent has to beat Point, Counter Point is attacking but that is punished severely by Ghost Riposte.

Degrey is a read heavy character. He has good punishes off his options but his options are slow. Being able to pick up on the opponent’s tendencies and habits is the main step into becoming a strong Degrey.

There you have Jefferson Degrey the Ghostly Diplomat. Degrey can hit incredibly hard, has the best dodge in the game, and essentially has the fastest throw in the game. His weaknesses are he is slow, his cards don’t chain together well, and is very weak on knock down turns. If you want to play a read heavy character that can force the opponent into bad situations with his Rhetoric then check out Degrey.[/details]

6 Likes

[details=Summary]Valerie Rose the manic painter is kind of Yomi’s jack of all trades character. She has both fast attacks and throws but not the fastest in either category. She has some really fast combo starting attacks but again not the fastest in the game. She has card draw with her superbly versatile aces but still not the best card draw in the game. Her health at 80 isn’t the best but isn’t the worst either. She has a lean towards rushdown but usually can’t get started as quickly as the other rushdown characters. The one category that Valerie is tied for highest in game is combo points, she has an astounding 6cp. This jack of all trades status shouldn’t be confused with Grave’s all around fighter status. They are very different fighters with very different play styles.

Valerie’s innate, Agile Hands, allows her to combo her normal attacks in any order. This means that Valerie can do crazy high damage combos with her normals while still being able to start them with her fastest normals. Combos like 255666 would deal 28 damage and allow Valerie to search her deck or discard for all four of her aces. Being able to combo a chain of normals and get four aces is something that only Valerie can do. Since her normals can combo in any order she gets aces from normal chains quite often too. This also means that Valerie will rarely have to power up for aces. Allowing her to spend all her cards in combat.

Let’s delve into some of Valeries options and see what tools are available to the Manic Painter

Valerie’s normal attacks are better then average speed wise at x.4 which is good because Valerie will want to combo with these. One thing that is very important for Valerie is being able to chain normals to get aces. If she wins combat but doesn’t have enough normals to chain together to get at least a couple aces then it might be better to not continue the combo and save the rest of her normals until she does have enough to chain together to get her aces. (Things will of course change depending on the life total of the opponent and how many cards and what cards Valerie has in hand at a given moment).

The more normal attacks Valerie can play the more efficient it is in terms of number of aces drawn. For a three normal attack combo Valerie will get only one ace. However for a six normal combo Valerie will get four aces. One of the things that is interesting about Valerie’s combos is just how efficient they can be. If she hits with a normal she will draw a card, then she combos into five more normals she will get four aces. When Valerie combos with three to six normal attacks from hand she will not lose any cards (normal draw + aces + draw for start of turn). In fact not only will she not have lost cards she will have replaced them with better ones.

Valerie’s throws are some of the fastest non-grappler normal throws in the game. Her throws are pretty great. The only downside to them is they take up 3cp which means if she wins with a throw she can only chain a maximum of 3 normal attacks after the throw. Luckily for Valerie she has some great attacks to stick on the end of throws and at times just taking the KD can be fantastic because it will allow Valerie to play a strong mixup normal game.

To make Valerie’s attacks and throws even better she has the ability Burst of Speed (BoS). BoS allows Valerie to make her combat revealed attack or throw 2 speed faster to a minimum of speed 1.0. This ability can stack with itself. This means that if Valerie plays a 2 attack and has BoS back up she can get it down to speed 1.0. This is great for Valerie because 1.0 beats out a lot of scary stuff and it allows her to get her combos started at a really fast speed (for a combo starting card such as this).

It can also be great for her throws. One BoS on any of Valeries non-ten throws and she will beat out most non-grappler normal throws. Having a BoS (or two) in hand can be quite comforting in most mu because it means that Valerie doesn’t have to be as concerned with the opponents high damage combo starting options.

Just to make Valerie’s normal attacks even more scary she has Bold Strokes. Bold Strokes makes all her normal attacks for that combat deal +1 damage and she gets to draw a card. This card is solid for a couple of reasons. Not only does it make all her normal attacks (which are all effectively linkers) deal +1 damage but it draws a card. This card draw is important because it could potentially draw Valerie into more of what she needs, whether that be more normal attacks, face cards, or aces depending on the situation.

This ability does stack with itself making Valerie’s normal attack combos truly devastating if she has two or three copies of Bold Strokes. Take the above combo of 255666 which previously did 28 damage. With two copies of Bold Strokes played it would do 40 damage instead!!

Bold Strokes can also be used on a combat loss to try and draw into a Joker. This is some what of a desperation move and the choice to do this should not be take lightly.

The only downside to ability is it is on Valerie’s 7 throw, which is her fastest throw. Thought must be put into whether using the card for the ability is worth losing one copy of Valerie’s fastest throw.

Valerie’s various face cards serve different purposes. She has one that deals lots of damage, she has a reversal to keep her safe from scary cards, and she has a (usually) combo starting card.

Three Colors is Valerie’s damage dealing face card. It tops out at 21 damage for only 2 of her 6cp. Valerie can stick this at the end of any normal attack or throw combo for big damage.

Throw6J++ deals 33 damage

The downside to this card is that it can only be pumped with face cards. When wanting to go for big damage Valerie will have to prioritize her face cards and be able to ascertain which face cards she could do without.

J is also Valerie’s highest damage dodge follow up. In some mu where the opponent has lots of 1.0 speed attacks dodging can be important to Valerie so saving J for following up dodges can be beneficial.

Crimson Passion is Valerie’s reversal. At speed 0.2 it will outspeed a lot of attacks, it will also outspeed the vast majority of high damage dealing attacks in the game.

This cards main purpose is to beat out attacks that are speed 0.4 - 1.0 and should be used as such. It isn’t great as a combo ender because Valerie needs it to beat out some important attacks. The pump isn’t super efficient either at +3 damage per discarded card (up to two discarded cards) the pump really should only be used if Valerie can kill with the extra damage or if she has a bunch of spare cards lying around.

Flying Rainbow Stroke is Valerie’s combo starting face card. It’s actually a linker but to take advantage of the cards ability it needs to start the combo. Splash of Color says: This can only be blocked by a block of the same color. So on the card pictured above in order to block it the opponent would have to play a red block. When playing with and against a painter people are going to have to pay attention to the color of their cards.

This card can help Valerie get around blocks and still combo into up to five normal attacks to get at those aces. It can be tricky to land but if Valerie notices that the opponent tends to block with the same card and she has the appropriate color of K she can punish them for being so careless with their colors. Or, the somewhat more risky option, she can just lay one down and hope for the best.

The speed of 3.4 might seem pretty slow for a combo starting move but if Valerie has even a single BoS she can get this crazy card down to speed 1.4.

The card is a linker so it can be stuck in any combo. This isn’t that exciting for Valerie because her normal attacks are already linkers. K is mainly only used in combos when the damage will matter or when Valerie is out of normal attacks (If K is used in a combo make sure it is at the end of it. No need to brake up normal chains).

If Valerie’s normal attacks are her bread then her aces are her butter. Valerie’s aces are key to her game plan. Her normal attacks chain together easily to get her aces and then thanks to the ability on it, Unbounded Creativity, when her aces hit it draws her a card which helps her keep up her offense.

There is a lot of versatility in Valerie’s aces. The Chromatic Orb side is a single ace attack that deals a very solid 10 damage (and above average chip damage too). In addition to solid damage it has the solid speed of 1.0. Valerie can use Chromatic Orbs to poke at the enemy and be safe from a lot of their scarier high damage dealing options. This move is can’t combo so unlike all of Valerie’s other moves it will never find its way into her combos.

The Masterpiece side is a almost always only used at the end of combos. It costs two aces to play but does 16 damage and is only 2cp. Being able to put this strong damage into her combos is crucial for Valerie to be able to deal lots of damage to opponents off of any win. Three Colors (Valerie’s J) does deal more damage then Masterpiece for the same amount of cp but requires face cards to discard and it takes a lot more cards to deal the 21 damage from Three Colors then it does to get the 16 damage from Masterpiece (Three Colors costs 3 face cards while Masterpiece effectively costs one card [because it draws a card, although the drawn card will likely not be as good as aces]).

Thanks to Unbounded Creativity Valerie goes card positive when she hits with Chromatic Orb. and because of her innate and Unbound Creativity her hand hardly gets smaller when she hits with a normal attack combo into Masterpiece.

Take for example this Masterpiece combo:

2456AA

Valerie would get one card for hitting with a normal, she would get back the two aces she played thanks to hitting with a chain of 4 normal attacks, and finally should would get to draw a card thanks to Unbounded Creativity. With the draw for the start of the turn Valerie would only have one less card then she did on the previous turn and she just dealt 33 damage!

Valerie, just like every one else, has her weaknesses. for the most part she has pretty bad dodge follow ups (J++, A, and AA are good dodge follow ups, Throws can be pretty good too depending on the mu). She can struggle vs characters that have lots of attacks in the 1.0 or faster range. Since most of Valerie’s damage comes after she wins combat she is weaker to blue burst jokers. Also while she has some rushdown as the game goes on she takes longer to get started then other characters.

So there you have Valerie Rose, the Manic Painter. If you want to play a character that is a Jack of all trades with above average speed throws and attacks, with easy access to versatile aces and is able to create combos easily then give Valerie a try.[/details]

6 Likes

[details=Summary]Max Geiger is a scientist with his main area of study being time and its manipulation. This time manipulation comes through Geiger’s abilities. One of these abilities is his innate, Time Stop. Time Stop says that if the opponent takes block damage from a Time Spiral you can throw them and you get to continue your combo. This shows how good Geiger is at controlling time because when the opponent blocks his Time Spirals he essentially freezes time which allows him to walk up and throw the opponent.

Geiger has three different Time Spirals in his deck. His J, Q, and one of his AA attacks are all Time Spirals. These Time Spirals keep Geiger safe from the opponents throws (which is good because his throws are slow), their attacks that are slower then these Time Spirals, and their blocks (as long as Geiger has the throw in hand). Geiger can be especially dangerous when he KD the opponent because now they can’t even dodge which further increases the power of Time Spirals, this will of course be mu specific and Geiger will have to play some of his other combat options to fully threaten the opponent.

Geiger can not get too carried away sending spirals into opponent blocks and then comboing them because it will eat up a lot of cards. Geiger is a character that wants to build up a large hand to be able to achieve maximum scare from his Temporal Distortions (more on this later).

Let’s get into some of Geiger’s cards

Geiger has average speed normal attacks at speed x.6 and slow normal throws at speed x.8. Also Geiger has no 4 attack. This means that Geiger can not get a straight off of his fastest normal. In addition he can only ever get one ace from normal straights and this is off his very slow 5 normal. Geiger will usually have to power up or draw into his aces.

Not a lot to say about Geiger’s throws, they are slow so he will commonly lose throw clashes. The upside to them is they do higher then average throw damage at 8. He will need to have a throw in hand if he wants to make use of his innate.

Stats wise Geiger’s J is as standard as Js get: 8 damage, 2.4 speed, and it’s a 1cp ender. What sets this J apart though is that it is a Time Spiral, a Fast Time Spiral to be more specific. This is one of Geiger’s cards that benefits from his innate ability. If this card is blocked Geiger can follow up with a throw and then continue his combo. Some standard combos are:

JThrow = 10 damage (the 2 chip for Fast Time Spiral deals damage too) and KD
JThrow56 = 21 damage
JThrowQ6 = 22 damage
JThrow6J = 24 damage - this combo and the previous three all deal more damage but they eat up more cards and the latter two take up extra Time Spirals.
JThrowK = 20 damage and KD

Geiger can also get one more damage out of each of these combos if he uses his Suplex of Science throw. This throw is attached to an extremely important ability for Geiger (Temporal Distortion) so this option should be taken rarely.

Geiger’s Q is his Slow Time Spiral. It benefits from his innate but it can be a pretty risky card to play as a combat option because a lot of attacks will beat it. It is quite useful to Geiger though because it is his only linker (when he isn’t distorting time that is, more on that later) and can allow him to string combos together that wouldn’t otherwise be possible for him.

Flash Gear isn’t a Time Spiral, his opponents are very grateful for that, but it is a strong attack for Geiger. Flash Gear is Geiger’s reversal, at speed 0.2 it can be used to keep Geiger safe from a lot of the more frightening attacks in the game. A few things that are unique about it is that it causes KD, no other reversal in the game KDs and it only costs 2 of his 4 combo points meaning he can combo into it off any combat win that allows comboing.

Now Geiger’s aces is one of his main cards that makes up for the standard to slower speeds of all his other cards. On one side there is Time Spiral Hurricane at speed 2.0 it is Geiger’s fastest Time Spiral and it deals 3 chip so if it is blocked its follow up combo will do one more damage then the other Time Spiral combos (not the greatest consolation prize but it is one none the less). It will do 20 damage if if connects. It only takes up 3 of Geiger’s 4 cp so if Geiger wants to try and play it safe he can attempt to poke with a normal or Q and combo into Time Spiral Hurricane. This move requires two aces to be able to play it

The other side of the ace is the very impressive Cycloid Revolution. at speed 0.0 and dealing 20 damage it is one of the more powerful attacks in the game. It costs two aces to play for that 20 damage but if it connects Geiger can pump it with up to two additional aces for +10 damage each making this 0.0 speed move top out at 40 damage!! One thing that is great about this is Geiger only ever has to risk two aces but then has the option to play more aces if it connects. The only downside to this is if the opponent has a joker they can cancel the pump damage or if they play a speed 0.0 attack of their own they can trade with it. This will most likely be a fine trade for Geiger though.

Now on to Geiger’s abilities

If all Geiger had going for him was his ace attacks he would not be so good. However, this is not the case because Geiger has the Temporal Distortion ability. Temporal Distortion allows Geiger to get a J or Q from the discard then all his Time Spirals are 0 cp linkers that do +1 damage and are immune to Rewind Time Jokers!!! Geiger Stays in Temporal Distortion until he is hit by an attack or throw.

This card ramps Geiger up to crazy levels. It allows him to not only do the most damaging combos in the game (by a large amount) but it makes all the Time Spirals immune to face down Jokers. If Geiger has all four of his aces and he wins a combat it is usually a game win for Geiger. A pretty standard Temporal Distortion combo with four aces in hand might look something like this:

AA7AA6JQQK = 88 damage!! with 65 of the damage being unpreventable!!!
Geiger could also start this combo with the slower 2.4 speed J if he is worried about whiffing and losing his aces.

Important note: Temporal Distortion Time Spirals are only immune to Time Rewind Jokers and not to Gold Burst Jokers

Now this combo took 10 cards so for Geiger to get those truly absurd Temporal Distortion combos he must build up a large hand. He would do this by either blocking and not getting thrown and poking out those throws with normal attacks and not following up with a combo.

Another important thing to know is that Geiger’s fastest card he can start these crazy combos with is speed 2.0, many opponents will have a lot of moves that are faster then that. Geiger has a couple of ways around this. He can either try and block or dodge all those moves that are faster, in Temporal Distortion times this can be easier for Geiger to achieve because it can be horrifying for the opponent to try and throw him (do not count on this some opponents will not fear). Or since Geiger’s Cycloid Revolution AA attack is speed 0.0 he can play that to deal with opponents that are just spamming attacks at him that are faster then 2.0. Now Cycloid Revolution wont start a combo for Geiger but it still can deal very large damage if Geiger has all four aces.

Geiger’s last ability, Research & Development (R&D), works very nicely with the rest of his kit. It allows him to look at the top X cards of his deck, put one in his hand, then put the rest on top of his deck in any order. X = the number of Time Spirals in Geiger’s discard pile.

This rewards Geiger for playing his Time Spirals by putting them in the discard and since he can power up to get his aces out of the discard and Temporal Distortion lets him pull either a J or Q out of the discard he can play his Time Spirals to get greater benefit from R&D with out making his Temporal Distortion turns weak.

The card Geiger adds to his hand and how he arranges the cards largely depends on the situation. If Geiger is missing one of the four combat options he might prioritize getting that missing option. If there is a card that allows him to power up for an extra ace he might want that soon. If there is a strong attack or Joker he might take that. The possibilities and options are pretty open to Geiger when he engages in some R&D. The more Time Spirals in the discard the more effective this card will be.

So there you have Max Geiger the precise watch maker. He is a character that can do insane unjokerable damage, has super strong aces, and the ability to manipulate his deck. He does have his weaknesses. He doesn’t have very many dodges because he has only two ranks of dodges he is okay using, the strength of his aces and Temporal Distortion ability are made up by the fact that his other cards are average to below average. If you don’t mind these weaknesses, want to do insane damage and if you don’t like Jokers I’d recommend you check out Geiger.[/details]

6 Likes

[details=Summary]Gloria Grayson the Hopeful Healer is one of the more complicated characters in Yomi. However if you are up for the challenge she can be just as rewarding as any other member of the cast and she has a very unique play style, she’s a card engine/combo deck character.

Gloria’s innate ability, Healing Touch, allows Gloria (at the end of the turn if she isn’t KD) to discard two non-Hearts cards to gain 4 life and fetch a Hearts card from her discard pile. This has several uses. For starters, it heals Gloria and gets her her best or missing option back in her hand as long as it’s a Hearts card. Because of her innate the opponent will be forced into action vs Gloria. They can’t just go block/block with her to try and build up a large hand because if they do Gloria will be able to heal a lot of life in the mean time.

Gloria’s innate also means that if she has two copies of the same rank in hand (with one of them being Hearts) and she wants to play a card of that rank she should always play the Hearts version. The reason for this is because she can get the Hearts card back if needed and Hearts cards can’t be discard to fuel her innate.

Gloria is also pretty decent at keeping opponents off of her. While she doesn’t have any super fast moves and her normal attacks and throws are slow; her face cards are solid speeds and generally have strong rewards for winning combat.

Now let’s get into her normal moves

Gloria’s normal attacks are slow, they are speed x.8. She has the normal spread of attacks (on ranks 2-6) so it is possible to get a four card straight and search for two aces (aces are critical to her game plan but more on this later). This is a risky play though because of the speed of her normals. Since her normals are slow it can be difficult to make use of the normal attack side in most mu but if she can land a 4 card straight it has a large pay off (don’t blame me if your straight attempt gets undercut, you’ve been warned).

Gloria’s throws are also slow. She has them on the usual ranks as well (7-T). There is one throw in particular that will make Gloria go Yippee! Her 7 of hearts is that throw. This card will usually be the second fastest throw in the mu and she can get it back through her innate. The opponent will eventually run out of their 7 throws and then all of the sudden Gloria as the fastest throw in the mu. Being able to recur 7 of hearts is a powerful tool especially the longer the game goes on.

Gloria’s throws can also combo into good stuff. Like her J for example

First the ability on J allows for Gloria to heal even more then her innate already allows. If Gloria hits with either side of J she can return the card to hand and heal herself and the opponent for 4 life.

Gloria’s J has many uses and is an important card for Gloria. Ray of Moonlight is a great throw punish (since it is slow you’re going to want to be certain that they will throw or that they are playing an even slower throw punish) it is also a solid dodge follow up. J also works well with her Healing Sphere ability (more on that later).

Moonlight Sphere is just an all around good card. Having a 2.2 speed linker that heals and recurs on win is great stuff.

It might not sound too exciting at first because it heals the opponent as well but J is a very good card. It allows Gloria to get free damage (because the card returns to hand) and heal herself. Let’s take a look at some sample combos (all of them assuming Gloria hit with Moonlight Sphere):

J6J6 = 14 damage, Gloria heals 8 life and she only lost 2 cards from hand

J456 = 16 damage, Gloria heals 4, she gets an ace, and her hand size only goes down by 2

throwJJ = 8 damage, Gloria heals 8, and her hand only goes down by 1 card

(the damage on all these combos can be increased by 10 thanks to her ace ability. More on that later).

This throw combo might not seem that exciting because of low damage but healing 8 life is strong and after the draw phase her hand size will remain the same. This allows her to be a bit aggressive right from the start of the game if she has the Js.

Just because Moonlight Sphere is a Linker doesn’t mean Gloria can’t use it to start combos. It is actually a good card for starting combos in a lot of mu.

Gloria’s Q is an interesting card. Sunburst is her fastest non ace attack, it is also her most inefficient face card. It deals a max of 13 damage which is pretty decent but it only does 6 up front and +7 if pumped with a face card.

Sunburst being speed 1.0 is great. This is a very important speed. In several mu this card can be Gloria’s saving grace. Getting Q of Hearts in a lot of mu is another card that will make her go Yippee! Knowing when and with what face card to pump with will also come down to the particular mu as well. Against some of the rushdown characters speed 2.2 is just too slow of a card and Gloria can freely pump Q with J or K. In other mu J and K will still be very useful and Gloria will just want to save Q to beat out or clash with certain scary mix ups.

Sunbar Cage gives her Q some nice utility. It gives her another throw and it is her most damaging non ace dodge follow up. It is also pretty inefficient but when Gloria can kill off a dodge with it she probably won’t mind it so much.

Fountain of Light is a solid card. It has the good speed of 2.2 and does 9 damage and KD. It being a Can’t Combo move is its only real downside. The KD can also be great in mu where Gloria is faster than the opponent. Not a lot to say about this card other then it is good and it can be used to set up some very safe Healing Sphere turns.

Gloria doesn’t have any super fast attacks and still needs to do a bit of hand building. Like most of the cast, she will have to block sometimes. Don’t try and use Gloria’s solid face cards to rushdown the opponent.

Healing Sphere is one of the cards that allows Gloria’s engine to work. This card’s ability stays in effect and allows Gloria to draw a card at the end of turn if she healed that turn. She has to discard all Healing Spheres from play if she didn’t heal or was thrown.

Without this card Gloria’s hand would shrink by one every time she used her innate and it would get filled with more Hearts making further uses of her innate less likely. But just having one copy of this card attached allows Gloria to go card even every time she uses her innate. The card draw gets even better the more she has attached.

The main way for most opponents to get rid of Healing Spheres is to throw Gloria or dodge into a throw. So if she gets the opponent KD and then attaches a bunch of Healing Spheres she can usually be guaranteed at least one turn of getting to use all her attached Spheres (as long as she attacks while she has the Spheres attached and the opponent is KD). Again this is mu specific and some characters can KD off an attack which would prevent Gloria from being able to heal.

The ability tied to Gloria’s slowest throw so this card is 99.1% of the time used for the ability.

Gloria needs to be careful when she attaches Healing Sphere. She is going to want several non-Hearts cards in hand so she can actually heal and make use of it.

Now getting to draw all these juicy Hearts cards and Healing Spheres would be a lot more difficult if not for Gloria’s ace ability: Overdose.

When Overdose is played it deals both players 10 damage, Gloria takes this damage first. If Gloria won combat she draws two cards.

So the ability alone turns Gloria into a card drawing machine and allows her smaller damage combat wins to turn into something special. Gloria should generally slam down this ability on any combat win if she has it. She really needs the cards and all the damage she can get. Dealing 10 damage to Gloria might seem rough but with all the healing from J and her innate she will actually be taking a lot less then the opponent from this ability (as said before she also really needs to deal this damage).

There are also times that Gloria should use Overdose even if she doesn’t win combat. These times include if it would kill the opponent (Gloria needs to be at 11 or more life for this to work) or if it could set up the kill for next turn. There are lots of things to consider when playing Overdose this way and this is just one of the things that makes Gloria a tricky character to play.

Overdose is extremely important to Gloria. It’s what makes her character work at its best. Gloria needs to get ace of Hearts into hand as quick as possible (don’t kill yourself trying to get it in hand though). When deciding what Hearts card to pull out of the discard, if the Ace of Hearts is in the discard she should usually take the Ace (having other aces in hand could change her priorities).

Gloria does have some strong attacks on her aces. These are not used as much because of how critical Overdose is to her game plan and she will often have to bust up pairs to power Healing Touch. Because of this it can be difficult to get lots of aces in the early and mid game.

Twilight Key can be attached onto any combat win that can combo. It really should only be used if it could kill or if Gloria has three aces in hand (two for the attack and the third to use for Overdose). If Gloria Can’t Overdose after playing Twilight Key she would usually have been better off comboing into something else and then Overdosing. If Gloria does have three aces in hand Twilight Key can make for some great damage. Throw into Twilight Key then Overdose is 34. Or J6AA then Overdose for 39 (as long as the J didn’t heal).

Sun and Moon is Gloria’s fastest attack. It requires three aces but does 29 damage for 1cp! It is a starter though so she either has to dodge into it or risk three aces by playing it. If it does connect it can do huge damage AAA56J then Overdose is 55 damage! While it is a ton of damage it can be a risky play because it puts so much on the line.

Gloria’s strengths included: solid face cards, lots of healing that can turn her 70 health into 94+, able to recur options, good spread of options, and can set up strong checkmates.

Her main weakness is that if she gets successfully rush downed or loses several combats back to back, it can be difficult to get her healing/card draw going which will make her 70 health look very sad. She also can have trouble with draws (she really wants certain cards in specific mu) luckily her abilities can help her there.

Well there you have Gloria Grayson. You may have noticed that I mentioned several times that the strength of several of her cards really depends on the mu. This is another thing that makes Gloria tricky to play as a starter character. It requires not only that you know Gloria but have a good understanding of the opponent’s moves as well. But if you want to play a character that sets up an engine, has a combo deck feel, and has to play a puzzle game with her own hand in addition to fending off the oppoent then Gloria is probably for you.[/details]

6 Likes

[details=Summary]Gwen Grayson (yes, Gloria and Gwen are sisters) the doomed Wanderer is a rushdown character that is racing against the clock. She is slowly dying to her own innate ability. This means she has to close out games before she succumbs not only to the damage the opponent will deal but to the damage she is dealing to herself.

Gwen has two innate abilities the first one, Shadow Plague, has two effects. During the draw phase she draws an extra card (for a total of two cards) and she takes 2 damage. The heightened card draw is what fuels her rushdown and the 2 damage is what puts her against the clock. Gwen’s 85 health might look like a lot for a rushdown character but because of the Shadow Plague she actually has a true health of around 70 (could be more or less depending on how many turns the game goes or if she healed at all).

An important thing to realize is that if Gwen gets too far behind she can get checkmated more easily than any other character in the game. If she’s at 2 HP and the opponent is at 23 HP and has a Joker Gwen just loses (as long as the opponent plays it right). So don’t get that far behind.

The second innate ability, Relentless Strikes, allows her to deal a bit of damage even if the opponent blocks her attacks. If her non-Ender attack is normal blocked she can discard a red and black normal attack. If she does the opponents block is discarded and the black normal hits (in addition to any chip damage the first attack did). The opponent still gets to draw a card for blocking. This isn’t the end all be all ability for Gwen but it does help her stay aggressive and helps deal with the ticking clock that Shadow Plague puts on her. This ability will chew through a lot of Gwen’s cards so it is not her main plan but it is more of a consolation prize, it also prevents the opponent from building up too much when her attacks are blocked.

Gwen has the fastest normal attacks in the game. At speed x.0 they can be pretty frightening. She has her normal attacks on the usual ranks of cards (2-6) so it is possible for her to get a 5 card straight which would get her 3 aces and all starting from a speed 2.0 attack!

It is important to pay attention to the colors of Gwen’s normal attacks. She needs a red and black normal to make relentless strikes work. Only the black one hits though. So keeping reds of less valuable ranks around (3/4) and keeping blacks of higher ranks (5/6) can be beneficial. Again Relentless Strikes isn’t Gwen’s A game so she shouldn’t knock herself out trying to keep these kinds of cards around. If she can convert all her normals into a straight she should probably do so. Just take note this because it is something to pay attention to.

While Gwen’s normal attacks are the fastest in game her throws are average, at speed x.6. They also appear on the usual ranks (7-T). Gwen’s attack combos are scary and if she can scare the opponent with them enough she can make use of her throws. Her throws can lead into good damage. Not a lot to say about Gwen’s throws. Scare the opponent into block/dodging then throw them.

One important note about her throws is that they take up 3 of her 6 cp. So she could still get a straight and good damage off of a throw (throw456 is 21 damage and an ace).

Now here is another one of Gwen’s scary attacks. This one isn’t scary because of speed, it is actually quite slow. It is scary because of the damage it can deal and its effect. If Chains of Ice hits the opponent they can’t make any more decisions that turn (such as playing a face down card). Next turn, their attacks and throws are 2 speed slower. Okay so both effects of this ability are amazing. The first part prevents the opponent from playing a card face down which means if it wins combat Gwen doesn’t have to worry about the possibility of a joker. She can just combo them for max damage. And when this moves max combo damage is 42 (J+K++A+) that is very horrifying to the opponent.

The second part of the ability turns Gwen into an absolute beast next turn. Some opponents can give Gwen a lot of trouble if they have a lot of attacks 1.0 speed or faster. Slowing them down by 2 really opens them up because even if they have a speed 0.0 move it is now 2.0 for that turn. When Gwen slows them down she is going to want play an attack/throw mix up since she will have the dominant speeds.

However, Chains of Ice is slow. At speed 3.6 it can be difficult to win with. It is one of the best throw punishes in the game though. If Gwen strongly feels a throw is coming and has J she might be well advised to lay down Chains of Ice. A safer way to get the effect of Chains of Ice is to dodge into it. While she won’t get the super combo damage on a win and the freeze effect won’t matter vs most of the cast she will still slow them down for next turn. This alone is a powerful tool for opening up Gwen’s offence.

The other side of J is Links of Ice. This card is one of only two of Gwen’s linkers so it is still an important option to her. It is most useful if she starts with a fast normal and doesn’t have a straight of normals she can still connect them. For example going 2J56A+ is a very strong combo made possible because of Links of Ice.

At 5 chip damage it is Gwen’s best attack to get blocked. If she has a red normal attack and a black 6 she can turn a previously lost combat into a respectable 11 damage combat win.

Shadow Slice is Gwen’s reversal. At speed 0.0 she can use it to beat out all those annoying 0.2 – 1.2 attacks that will stop all her fastest combo starting attacks. Because it is Gwen’s only attack below speed 1.0 she will not want to toss it away on any old combat. She really needs it to beat out those previously mentioned annoying attacks.

One of Gwen’s themes is low damage per card and her Q is no exception. Because of this Shadow Slice generally does poorly when it trades with other speed 0.0 speed attacks. To deal with these she will have to dodge them. Luckily Gwen has an above average amount of dodges (16).

Burnbarrow is Gwen’s fastest combo starting card. It is also a linker so it can be stuck into any combo for good damage. At speed 1.2 it is fast and will beat out a lot of stuff. Gwen just needs to be mindful of the speeds on the opponents attacks (for example against certain opponents the 2.0 speed of her normal 2 attack and 1.2 speed of Burnbarrow is identical or very nearly so).

Because Burnbarrow is a linker Gwen can create all sorts of combos even stuff like K++K++A+ for 40 damage! It is a card that gives Gwen a lot of flexibility with her combo options.

Burnbarrow also continues the theme of low damage per card. K tops out at 12 damage for only 2 CP but it takes 3 cards to get this damage. Gwen’s extra card draw really helps mitigate this low damage per card weakness. Gwen can dump her hand down to 3 or 4 cards and in 2 turns or so she’s right back in the action with a threatening hand (providing she did some hand building during those turns).

Gwen’s special block, Gloria’s Remedy, is very helpful to Gwen for a couple of reasons. When she blocks an attack with it she takes no chip damage, this is good because a character that is racing against the clock can’t afford to take lots of chip damage. If it does block an attack or joker she discards it and doesn’t draw a card but gains 6 life. Gaining 6 life is great for Gwen because it buys her a few more turns to kill the opponent. The fact that it doesn’t draw a card and is discarded when it successfully blocks isn’t a big deal for Gwen because of her innate allowing her to get extra cards any way.

It is a good block for Gwen to have to the point where if Gwen wants to block and she has T in hand she should probably just use the T (this will not apply if Gwen has anywhere between 80-85 health).

The fact that this block exists will make the opponent a bit more likely to try and throw her which can open them up to getting hit by Chains of Ice.

Gwen’s ace has two very different sides. They also might appear to be bad compared to other characters aces but something to remember is that Gwen draws a lot of cards. She will be able to power up and get straights more than the average character which will give her access to a lot of aces through the course of the game.

Dashgorger is an attack that can be put into any combo for 8 or 16 damage if Gwen has 1 or 2 aces respectively. Dashgorger can also be okay to play as a combat option if Gwen’s hand isn’t great.

Dreadlands Portal is a three ace throw for 22 damage. One of the nicest things about this throw is its speed. At speed 4.6 it will most likely be the fastest throw in the mu (the grapplers can still out throw this super however). This helps Gwen a lot when dealing with characters that can outspeed her normal throws. In addition to Dreadlands Portal being a fast speed it is Gwen’s best dodge follow up. One of Gwen’s weaknesses is her poor dodge follow ups (J+ is her second best) and Dreadlands Portal helps greatly here allowing her to get 22 damage off of a dodge.

There you have Gwen Grayson the Doomed Wanderer. If you want to play a rushdown character that has lots of card draw, explosive damage, amazing throw punish, tearing down blocks with attacks, fast throw super, and creative combos but don’t mind racing against the clock, weak dodge follow ups, and giving it your all with what little time you have left then you should check out Gwen.[/details]

6 Likes

[details=Summary]Argagarg Garg (hereafter called Arg) the Water Shaman is a friendly fishman. He wants to win the game peacefully… by slowly suffocating the opponent with his Hexes. Arg’s innate, Hex of Murkwood, deals 2 damage to the opponent at the end of each turn as long as he isn’t KD. This means that Arg puts the opponent on the clock and forces them into action. Arg can try and stall out the game as long as possible and keep the opponent off of him with his solid attack pokes.

Just remember, the longer the game goes on the more it usually favors Arg. If Arg isn’t KD for 10 turns that is 20 damage from his innate alone that he has done to the opponent. Arg only has 3 CP so he can rarely does large amounts of damage on a combat win but that is okay because of all the work his innate will be putting in.

Let’s get into some of Args options and see what the Water Shaman has to offer. Arg’s ace is so key to his game plan that we should start with that.

Bubble Shield is central to Arg’s game. Its ability is very strong. If Bubble shield blocks an attack or Joker Arg draws a card and gets to put the ace into play. While in play Hex of Murkwood deals an extra 2 damage AND the next time Arg gets hit with an attack or throw he takes no damage, the combat ends, then discard all Bubble Shields from play!!

The Bubble Shield ability is amazing on several levels. For starters it gives Arg more free damage each turn which is always good. Secondly Arg is safe from taking damage on his next combat loss (he would still suffer the special effects of cards such as KD).

The card is so good and Arg plays so few cards in a combat win that he can generally afford to go low hand to get an ace in hand. Once he has the ace he can play some deadly mix ups of Attack/Bubble Shield. Attack to beat throws, Bubble Shield to beat everything else. Arg can start mixing in throws to catch the opponent’s blocks and dodges as well. Even if he goes block/block with the opponent it is a win for Arg because he is getting more free damage.

That just covers some of the awesomeness of Bubble Shield. The other side of Arg’s ace is strong as well. Blowfish Spikes is a double ace attack and at speed 0.2 it is by far Arg’s fastest attack (his next fastest attack is speed 2.2). In addition to speed 0.2 it does 16 damage but if it wins it is more like 18 damage thanks to Hex of Murkwood.

Blowfish Spikes is also a 2 CP Ender so if Arg is afraid of committing two aces as his combat card he can try and hit with a normal attack or K and then combo into it. While this will do more damage it will be coming off at a much slower speed.

In addition to the protection provided by Bubble Shield Arg’s abilities provide him with even more protection.

Protective Ward reads: draw a card. This turn the opponent’s attacks and throws are Enders that can’t be pumped. If Arg throws this down he will be safe from the opponents strongest most damage dealing options (he will still have to look out for multi ace supers that aren’t pumped). Arg can play this if he just needs to buy more time so Hex of Murkwood can deal more damage or if he needs to get through a particularly scary mix up one turn.

Protective Ward is unfortunately on Arg’s fastest throw which means it will be tough to give up since it will usually be the second fastest throw in a mu. Because it is Arg’s fastest throw it should generally be used for the throw. The ability can still be quite handy at times (especially in certain mus) to get Arg out of a bind or to stall the game even more.

Crash and Flow can keep Arg safe from the opponent’s more threatening abilities by countering them. However it does have two downsides. It allows the opponent to draw a card and it puts the countered card on the bottom of their deck. This means that if the opponent has any aces left in their deck they can power up for aces in deck to shuffle their deck to be able to potentially draw that card again.

Despite these drawbacks it is still a good card and since it is on Arg’s slowest throw it can be reserved for the ability. Crash and Flow will keep Arg happy and safe from a lot of scary abilities the opponents will want to do.

Now let’s see what kind of damage dealing options Arg has.

Arg’s normal attacks are above average in terms of speed, at speed x.4 they are helpful in keeping opponents off of him. He has the standard spread of normal attacks (2-6) but he only has 3 CP which means he will never get more than a 3 card straight. But even that is good because Arg’s aces are fantastic. Arg’s ace block is so good that opponents will want to throw him to beat it. Because of this Arg can make good use of even his slower normals to punish those throws.

Arg’s throws are quite slow. They are as slow as throws get, at speed x.8. Arg can still make good use of his throws. The opponent will often block when they are trying to figure out how Arg will play or when they are just trying to build up a hand and stop his pokes. These are the times when Arg can scoop the opponent with a throw win.

Flying Fish is a solid all around option. It is pretty standard for a J at speed 2.4 and 7 damage. It is 1 CP as well which is good for Arg because it allows him to stick it into any combat win for some nice efficient damage. It can also be used as Arg’s combat card in a lot of mu. It’s nothing fancy but it gets the job done.

Water Spirit is Arg’s fastest non-ace attack. It also does his most efficient damage. It is a solid combat reveal. It effectively does 11 damage for a single card which is quite nice. 2.2 speed is a respectable speed as well. While normals can combo into this card it is usually better to save it as a combat reveal because it is Arg’s fastest face card.

Arg’s final face card, Sparkling Bubble, gives him a 1 CP linker. It will allow him to combo his faster normals into a slower but more damaging one.

The pump is inefficient. It requires a K and only does an additional 4 damage. Even if Arg has two Ks in hand he probably shouldn’t use the pump unless the 4 damage makes a sizeable difference (such as killing them, putting them very close to death, or some other ideal life total).

However K does give Arg his most damaging combos:

throwK+ = 16 damage

2K+J = 19 damage

K+AA = 26 damage (3.2 speed is pretty slow so this is a high risk/high reward play)

Hex of Murkwood would tack 2 more damage onto each of these combos.

(pictured again for emphasis)

Never forget the power of Bubble Shield. Both its actual power and its threatened power. Get Bubble Shield in hand and then attack through the opponents throw attempts and then Bubble Shield when you think they will try to outspeed your attacks. Beating the opponent to death with Hex and staff is the way of the peaceful Water Shaman.

There you have Argagarg Garg. If you want to play a long stall/keep away style of game and you don’t mind Arg being a bit slow (outside of Blowfish Spikes) or doing lower combat damage then Arg may be for you.[/details]

6 Likes